MalletKAT Complete Manual
1.Introduction
Version: malletKAT 8.5 (version 9 for the GS sound module)
(see “What’s New” in Section 1.3)
Congratulations! You have purchased the world’s most powerful MIDI mallet percussion controller.
The MalletKAT is a powerful MIDI controller that is designed to capture your playing gestures and performance. It transforms your performance into musical notes (MIDI data), and captures the details of dynamics, pressure, speed, dampening, pitch bend, vibrato, etc. — creating an incredible musical representation of your playing. It is this attention to nuance and detail that makes this instrument so enjoyable to play. It is by far the most powerful percussion controller ever created.
This latest edition of our manual was based on feedback from numerous beginners and professionals with widely varying degrees of experience with electronic percussion.
First impressions are the most powerful, and we want you to start on the right foot. So let’s start here:
You do NOT need an advanced technical degree to use your malletKAT!
Start Playing Right Now:
Those that wish to get their feet wet sooner than later will find that you can start performing music with your malletKAT straight out of the box in minutes by visiting the Quick Start Guide section.
Discover What the malletKAT Can Do:
The remainder of the introduction will talk about the unique and exclusive capabilities of your new malletKAT, including what’s new in the latest edition of the instrument firmware.
…and Discover How the malletKAT Can Do It:
The malletKAT Essentials section gives an broad overview of the capabilities of the malletKAT, as well as an overview of important essential concepts of how the malletKAT works.
The most popularly demanded features of the malletKAT appear in the Important Settings Everyone Should Know section.
Learn how the malletKAT’s various Playing Modes can expand your creativity and expression.
For everything else, there is the Programming Guide.
1.1.Basic Performance Features
Individual Pad Training
Everyone plays differently. The MalletKAT has a feature that “learns” your playing style. When you train it, the MalletKAT converts your softest and hardest hits from 256 possible levels into the 128 velocity dynamics that’s offered in MIDI. This gives the instrument the widest dynamic range possible.
Dynamic Articulations
Every Kit stores a set of minimum and maximum velocity ranges along with velocity curves to get the instrument dynamics tailored to personal taste. Dynamics can be used to change a sound at a particular velocity point. Besides setting any “gate” length of a sound, dynamics can also control how long a sound speaks. These “gate time settings” can also be controlled by a foot or breath controller. The MalletKAT can detect “rolls” and instructs the software to let the notes ring so they don’t have the machine gun effect heard on other devices. This is extremely useful when playing timpani or cymbal swells.
Acoustic Emulations
The MalletKAT can recognize “dampen” strokes, a common vibraphone technique and now “dead” strokes, a common marimba style of articulation. Like Individual Pad Training, dampening and dead stroke articulations can be tailored to respond to your personal style of playing.
Mono Modes
Special Mono Modes have been developed to allow you to play solo instruments such as flutes or lead lines without the “bleeding” of sounds heard when using a sustain pedal on a synth. Instead, the sustain pedal in this mode creates a legato single line passage. It is now possible to create staccato / legato articulations effortlessly. Auto Gate functions also help control the “bleeding” of sounds when playing fast passages. The length of a sound can vary depending on how fast you are playing.
1.2.Advanced Performance Features
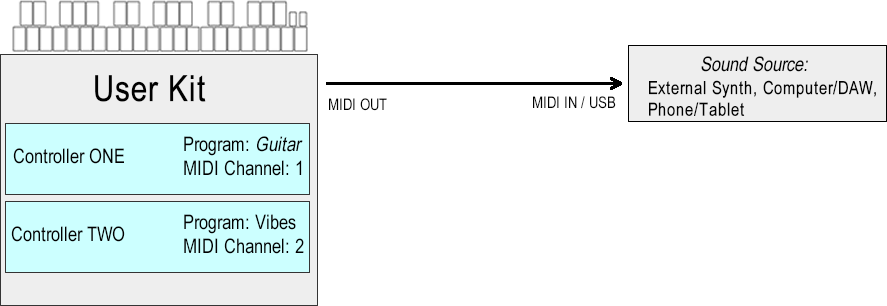
Multiple Performance Layers – Controller One and Controller Two
Each of the 128 User Setups on the malletKAT actually contains TWO separate MIDI controllers, allowing the performer to two separate sounds simultaneously in a number of highly creative ways! Each one of these controllers can have its own sound, or access the same sound. These two sounds can be played separately using a second sustain pedal (Hang Mode), combined (Layer Mode) or split across the keyboard (Split Mode). Each of these controllers can also have their own dedicated sustain footswitch.
There are SO many ways to utilize this exclusive functionality, that they are described in their own section: User Setup Playing Modes
To better understand how this concept, please refer to the section, How the malletKAT Works
Roll Modes
This mode is a necessary feature when playing drum and timpani rolls. This helps eliminate the dreaded machine gun effect when rolling on drum machines and other sound modules.
Pitch Bend and Mod Wheel
Imagine bending notes and adding vibrato to any sound without having to find a pitch wheel. Simply program a third footswitch to perform this function on the fly.
Note Resassignments
The malletKAT has 14 programmable note reassignment layers. Applying Reassignment layers to a User Setup allows you re-route any pad to another MIDI note and channel assignment. When combined with the two built in controllers, you can use reassignments to layer three sounds per setup, or use the new reassignments to LATCH certain pads in combination with your existing layer. These latch pads can control your loops with Start/Stop Commands. Reassignment mode can also replace your normal chromatic pad layout to any MIDI note and channel assignment you desire per pad. Great for special “percussion setups”. Reassignment 14 is designed to send out program changes instead of note numbers. This can be used to control MIDI lighting and other devices that accept MIDI program change commands.
Velocity Gate Control
Automatically control the length of a sound by how hard or soft you play. Adds expression and realism to any performance simply by naturally using your dynamics while playing.
Auto Gate
Playing fast runs with the sustain pedal down can be tricky business when trying to control note bleed. Auto Gate helps by making notes shorter when playing fast. Of course, this feature is programmable.
Built-in Metronome with Tap Tempo
Assign any MIDI note and channel to the list of rhythms (sequences) built in. Tap in your tempo and go. Great for practicing.
Create GROOVE Rhythms with notes and chords
Instead of a metronome click, you can also assign the metronome function to use one of many built-in rhythmic patterns including odd time patterns.
Synth Control
A controller needs to automatically set up your synths and sound modules, and nothing does it better than MalletKAT. The MalletKAT sends out three bank change (MSB, LSB), program change, and volume change commands per kit. It also sends out “controller values” so you can preset settings for reverb, chorus, delay and more, automatically. You can further adjust these settings via our two controller pedal inputs and one breath control input. Velocity ranges, octave range, gate times, channel assignment, etc. are also stored in one of the 128 User Kits. You have the ultimate control you need to make music. The MalletKAT acts as a MIDI Mixer built right into each setup.
DJ Surface Control (Real Time Control Mode)
Turn your MalletKAT into a virtual surface controller. Control programs like REASON and LIVE right from the MalletKAT. In this mode, the MalletKAT’s black keys represent the knobs and buttons on your synth. The white keys move the knobs left (low notes) to right (hi notes). Play rhythms in real time to create effects only possible with the MalletKAT. Use the MalletKAT’s other controller (layer) to play live on top of these effects.
MIDI Merging/Routing
The MalletKAT can function as a MIDI Merger. Incoming MIDI channel information can be filtered, routed, etc. A real time saver in the studio.
Programmable Footswitches and Controllers for Effects
While you can use the footswitch inputs as KIT INCREMENT and DECREMENT for fast Setup changes. You can assign special functions to them such as vibrato, pitch bend, combined sustain functions, and even play MIDI notes (up to four simultaneously). The two Controller Pedals can send out data on any of the 128 CC numbers. Special functions such as Blend, Warp, etc. are also featured.
Additional Tweakables
Lots of global “geek” controls like auto train value adjustments, synth fine tuning adj., data stripping, CC# assignments, scan control, MIDI routing, etc.
1.3.What's New?
malletKAT 8.0 Features:
Multiple Controller Numbers Presets Per User Kit
Every User Setup now stores and transmits up to 3 pre defined Controller Numbers along with a discrete value for each number. This means that now you can assign things like reverb or chorus settings in each kit.

Note: Kit Controller #1 resets the assigned discrete value to zero when exiting the kit. This means that if you have controller #1 set to Modulation, the malletKAT will automatically reset modulation to the neutral position.
All three controller numbers and values share the same MIDI channel.
Improved Dampening
Dampening now sends out a velocity of zero when seeing a dampening gesture. Version 7 sent out a velocity of 10, followed by zero. This created a little blip sound on some synthesizers.
Global Function Preset Changes
Alternate Mode will soon be releasing its KATALIZER Software, containing the world’s most powerful looper and mapper. Changes to the Global Screens allows for optimum routing of MIDI data for controlling looping and overdubbing. MIDI Merge is set to off, and all note numbers coming from all 16 MIDI channels are pre-routed to the internal sound card. When reinitializing the malletKAT, the malletKAT now defaults to USER Kits.
User Kit 128 Preassigned for controller use for the outside world.
Kit number 128 is preassigned not to send out any bank, program or control changes. Routing is assigned to EXTERNAL only. This allows for easy control to outside sound sources like the iPAD, computer, etc.
Ketron SD1000 Presets
User Kits can now be optionally pre programmed for Ketron SD 1000.
Just click on the sd1000 option at check out
malletKAT 8.1 Features:
Visual Editor Compatibility
The malletKAT 8.1 firmware chip corrected several minor issues with communication between the Visual Editor and the malletKAT.
malletKAT 8.5 Features:
4 MIDI Control Number Settings per User Kit
Each User Kit now has 4 programmable MIDI control number settings. This means that you can assign and store just the right amount of reverb, chorus, brightness, etc on every kit. As you move from kit to kit using different MIDI channels, the malletKAT now remembers these values so that multi track recordings sound the way you played them. (past versions reset any kit controllers back to zero when leaving the kit)
 Some of the KIT Shortcut numbers have moved slightly to accommodate the new screens. The KIT CONTROLLERs now start on shortcut #61.
New Velocity Curves
In version 8.5, we have changed some of the velocity curves in the malletKAT that we think will be more useful. Check them out.
malletKAT 9 Features:
Currently, malletKAT 9 features are only applicable to some internal controls for the malletKAT GS or gigKAT GS sound engine. There are no additional screens.
2.Quick Start Guide
Your malletKAT can be set up and ready to play in minutes! Review this section to see how to get started!
2.1.Back Panel Connections
The back connections on your malletKAT should look like this:

ON/OFF
Turns the malletKAT on and off.
DC INPUT
Make sure that you are using a KAT transformer or an adapter that matches our power specifications (15 Volt 1.6 Amps, Positive Tip). Our power supplies have a special screw in connector so that it stays attached during performances.
SUSTAIN FTSW 1
Use this footswitch when you want to sustain the sound that you are playing. It is very similar to the sustain pedal on a piano. The malletKAT comes with a sustain pedal (a square black footswitch – KF1). You can use this footswitch on any of the FTSW inputs. They can also be used on Foot Control inputs under certain circumstances. You might want to get some extra footswitches if you plan on doing editing and if you want to use all of the FTSW functions at the same time.
EDIT FOOTSWITCH
Insert a footswitch here when you want to edit the malletKAT. With the exception of changing kits (sounds), all of the editing functions require that you first step down on this pedal to begin an editing function.
SUSTAIN FTSW 2
This is the coolest footswitch input. Depending on the kit, when you step on this footswitch, a pre-determined function will happen. This includes things like pitch bending, octave shifting on the pads or even a different sound playing. You will have plenty of time to check these functions later.
FOOT CONTROL 1 and FOOT CONTROL 2
These two jacks are designed to be configured to use footswitches or controller pedals. Unlike the footswitches that are just an on/off connection, controller pedals move from up to down in increments. Depending on the function, they can control the volume of a sound, or affect the pitch of a note.
By default, Foot Controller One is assigned as a VOLUME controller.MIDI IN
You can attach a MIDI cable to this input, when you want to have some other MIDI device send information TO your malletKAT.
MIDI OUT
Plug a MIDI cable into this output when you want to connect the malletKAT to an external MIDI source.
There is also a second MIDI OUT port in the side of the malletKAT. These two ports can be used independently if your malletKAT contains an internal sound card.
OCTAVE EXPANDER INPUTS
These input jacks are for connecting your expander octaves (up to two per malletKAT). Expander ONE is the closet expander to the malletKAT itself. Note: Octave Expander cables must be attached before powering on the unit.
If your malletKAT has an internal sound card:
You will also find 1/4″ input and output jacks on this back panel. The INPUT jacks allow for adding an external source like a CD or MP3 player to allow you to play along.
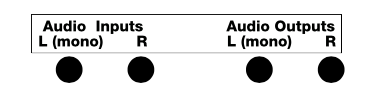
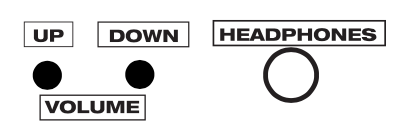
On the front of the malletKAT, you will find a 1/4″ headphone jack, and two buttons for raising and lowering the MIDI volume of the internal sound card.
2.2.Using the malletKAT Internal Sound Card
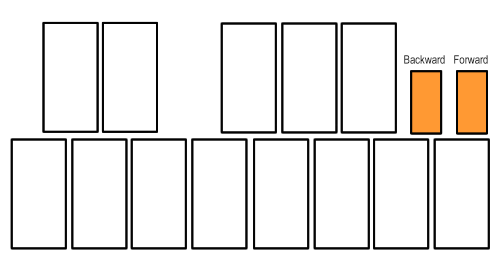
A malletKAT with an internal sound card comes with 126 pre-configured User Setups for immediate performance use. You can access all of these Setups using the smaller Forward and Backward pads underneath the LCD screen, or quickly with between setups using the shortcut found in Changing User Kits – a Shortcut!
Attach any pedals (sustain, volume, etc…) before turning the malletKAT on.
Attach your headphones and/or cables to your speaker/amp.
Turn on your malletKAT, and you’re ready to play!
Not getting the sound you expected? Review the Important Settings Everyone Should Know section and be certain that your instrument is set to use User Setups or Chains.
2.3.Connecting to an iOS/Android Device
To connect your malletKAT to an iOS or Android device, your device will need to have the proper iOS Camera Connection Kit or USB converter kit to receive incoming data. See your device manufacturer for details on using your device with MIDI USB.
Converting the malletKAT MIDI signal to USB can be done through the MIDI OUT port by either
- Directly connecting a MIDI-to-USB converter cable
- Using an external MIDI to USB interface. Some third party companies, like iConnect, manufacture MIDI interfaces with outbound ports for connecting to portable devices.
Attach any pedals (sustain, volume, etc…) before turning the malletKAT on.
Turn on your malletKAT, and you’re ready to play!
Is your device not receiving a signal? While all pre-programmed User Setups should be usable with your device broadcasting to MIDI channel 1 by default, User Setup 128 has been pre-programmed with a minimum of additional MIDI configuration specifically for generic use. Review the Important Settings Everyone Should Know section and be certain that your instrument is set to use User Setups (or Chains), and set the malletKAT to use User Setup 128.
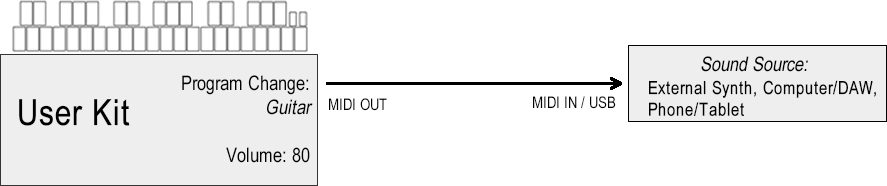
2.4.Connecting to an External Synthesizer
To connect your malletKAT to an external keyboard or synthesizer, use a 5-pin MIDI cable from the MIDI OUT port in the malletKAT to the MIDI IN port on the synth.
Attach any pedals (sustain, volume, etc…) before turning the malletKAT on.
Turn on your malletKAT, and you’re ready to play!
Not getting a MIDI signal? While all pre-programmed User Setups should be usable with your device broadcasting to MIDI channel 1 by default, User Setup 128 has been pre-programmed with a minimum of additional MIDI configuration specifically for generic use. Review the Important Settings Everyone Should Know section and be certain that your instrument is set to use User Setups (or Chains), and set the malletKAT to use User Setup 128.
2.5.Connecting to a Computer/DAW
To connect your malletKAT to your computer, workstation, or DAW, the MIDI signal will need to be converted to USB.
Converting the malletKAT MIDI signal to USB can be done through the MIDI OUT port by either
- Directly connecting a MIDI-to-USB converter cable
- Using an external MIDI to USB interface.
- Connecting the MIDI OUT of the malletKAT to the MIDI IN of an external sound card.
Attach any pedals (sustain, volume, etc…) before turning the malletKAT on.
Turn on your malletKAT, and you’re ready to play!
Not getting a MIDI signal? By default, all pre-programmed User Setups broadcast performance data on MIDI Channel 1. Make sure that the cables are connected to the correct IN/OUT ports and that your device is set to receive data on MIDI Channel 1 (or whatever channel you have configured your current User Kit to use). Review the Important Settings Everyone Should Know section and be certain that your instrument is set to use User Setups (or Chains), and set the malletKAT.
3.malletKAT Essentials
This section contains information on basic core functionality of the malletKAT. Refer to this section often when discovering what sort of things are possible, technically and creatively!
Striking a balance between ease-of-use and unlimited potential NEVER comes easy. Just a general understanding how a malletKAT User Setup works can go a long way in reducing confusion while taking advantage of what is possible!
3.1.How The malletKAT Works
Your malletKAT is a MIDI controller. It transforms every note of your performance into complex packets of MIDI data that containing all of the details of dynamics, pressure, speed, dampening, pitch bend, vibrato, note length, etc. These packets are then sent to your sound source, which takes this data and finishes processing it through.
The primary building block in using your malletKAT is the User Setup (or User Kit).
Your malletKAT comes with 128 fully customizable User Setups used to store your own own velocity response settings, gate time settings, octave ranges, external program changes, etc… When you have taken the time to get your sounds exactly the way you want them, you save them in a User Kit.
User Kits can be accessed using the smaller Forward/Backward function pads found under the LCD screen on your malletKAT.
User Kits for the KS with Built in Sounds
Alternate Mode uses sound engine from Kurzweil Music Systems that has been modified especially for the MalletKAT and trapKAT. We picked our favorite 128 sounds and programmed them into the User Kits. That means that you do not have to know about the innards of MalletKAT programming in order to enjoy playing. Just scroll through the kits and play. All of the work has been done for you.
The Kurzweil (KS) sound card was discontinued in December 2018. It is included here for reference.In these 128 User Kits, we loaded in the vibraphone and marimba sounds as well as the orchestral timpani, bells, chimes, xylophone, orchestral percussion, ethnic percussion drum sets as well as keyboards, basses, orchestral instruments, vocals, synth sounds and more. These sounds will keep you busy for quite some time. But if you want hear more, you can go through the instrument list of over 1000 sounds and create your own User Kits.
Complete list of the sounds in the Kurzweil internal sound card:
https://www.alternatemode.com/downloads/malletkat_ks/malletKAT_7_KS_Sound_List.pdf
User Kits for the Ketron SD1000
Alternate Mode offers both a firmware chip and a SysEx file download for use with the Ketron SD 1000 sound module. We picked our favorite 128 sounds and programmed them into the User Kits. That means that you do not have to know about the innards of MalletKAT programming in order to enjoy playing. Just scroll through the kits and play. All of the work has been done for you.
In these 128 User Kits, we loaded in the vibraphone and marimba sounds as well as the orchestral timpani, bells, chimes, xylophone, orchestral percussion, ethnic percussion drum sets as well as keyboards, basses, orchestral instruments, vocals, synth sounds and more. These sounds will keep you busy for quite some time. But if you want hear more, you can go through the instrument list of over 512 sound patches and create your own User Kits.
About the Ketron SD1000:
https://www.alternatemode.com/altmode-info/ketron-sd1000-midi-sound-module/
Pre-Programmed User Kit list for the Ketron SD1000:
https://www.alternatemode.com/downloads/ketron/SD1000-MIDI-Spec.pdf
Complete list of the sound patches in the Ketron SD1000:
https://www.alternatemode.com/downloads/ketron/KETRON-SD1000_mK_vK_UserKits.pdf
The default settings on your malletKAT have been carefully chosen to make your playing sound great without any need for additional programming. But when you ARE ready to start truly tailoring your malletKAT to your own individual needs, you will find it is capable of a great many amazing things!
Here is an overview of how a User Kit works:
When the instrument is first turned on and initialized, or a new User Kit has been selected, the malletKAT sends an initial packet of information your sound source containing things like:
Program Change information — setting the patch to use on your synthesizer (vibraphone, xylophone, piano, etc…)
Volume — setting the MIDI initial volume for the selected patch. This initial volume can be adjusted later by attaching a controller pedal to the malletKAT.
When you begin to play your malletKAT, communication continues to your external source containing things like:
Note Number — what pitch did you hit (A natural, B-Flat)?
Velocity — how hard did you hit it?
MIDI Channel — if your sound source accepts different MIDI channels (there are 16). More on this later…
Other important functions stored in a User Kit include the settings that are particular to the instrument, or the patches you are using. These include things like:
Octave — the octave range that the malletKAT is using must be translated before it is sent out.
Gate Time — the total length of time a note will sound when a pad is struck (without using a sustain pedal)
Monophonic/Polyphonic — the malletKAT can play chords (polyphonic) or will automatically dampen a note when a new note is stuck (monophonic)
Transposition — the malletKAT can transpose itself to different keys
When you start to consider all of these possibilities, you will see the value in having 128 presets (User Kits) ready and available during your performance!
Now for the most interesting part…
Each User Kit in your malletKAT contains TWO independent controllers.
They can have their own sounds, dynamic response, keyboard and octave range, etc. These sounds can be toggled back and forth by stepping on a footswitch, layered so that both play, or they can be split or overlapped so that both sounds are active at the same time.
If you have an internal sound card inside your malletKAT, remember that this sound card is a professional synthesizer. It is treated the same as described in this section.
3.2.User Setups, Factory Setups, and Chains
When you first turn on the malletKAT, it is in “Playing Mode”. There are three different banks that this playing mode can occupy.
User Setups (or Kits)
User Kits were described at the beginning of this section. They are the default bank for the malletKAT, indicated by a “U” in the upper left corner of the malletKAT screen.

Chains
In performance situations where you find you are needing to change User Setups very quickly, these setups can be organized in “performance order” into up to 16 User Chains. When your malletKAT is placed into Chain Mode, only those User Setups are available and can be easily stepped through and looped using the Forward and Backward pads or a foot switch. Chain mode is indicated by a “C” in the upper left corner of the malletKAT screen.
Factory Setups
Factory Setups are pre-programmed for General MIDI. That means that if you have a sound source that responds to General MIDI (it should have a GM MIDI logo displayed on it), the MalletKAT is ready to go without any programming involved – right out of the box. The instrument name that you see on the display is the sound that you will hear on your synth. Factory Setups are indicated by a “F” in the upper left corner of the malletKAT screen. For more information on General MIDI, refer to the section, Understanding External Synthesizer Program Changes
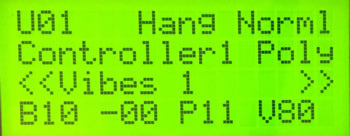
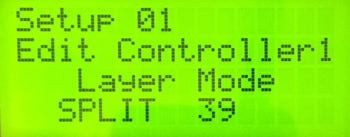
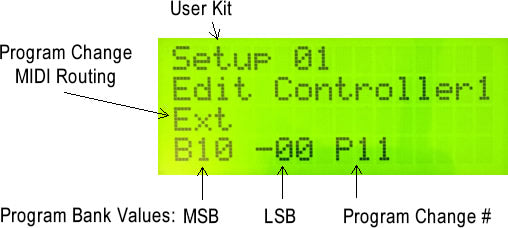
3.3.Reading The malletKAT Screen
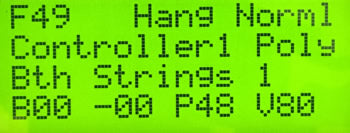
When you first turn on the malletKAT, the display tells you on the second line what version number of the software that’s inside your malletKAT.
When it finishes initializing itself, it is officially in Play Mode.
Even though there are only four lines of text on the LCD display, there is a LOT of information on this screen.
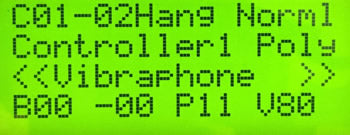
KIT (SETUP) NUMBER
The very first character on Line one will either be:
F followed by a number. Example F01 meaning Factory Kit 1 or
U followed by a number. Example U89 meaning User Kit 89 or
C followed by a group of numbers. Example. C02-12 Meaning Chain Two, Step 12.
You can step through Kits or Chains at any time by using the Backward /Forward Pads. (The little function pads on the far right of the malletKAT). Strike the pad twice to get your direction going.
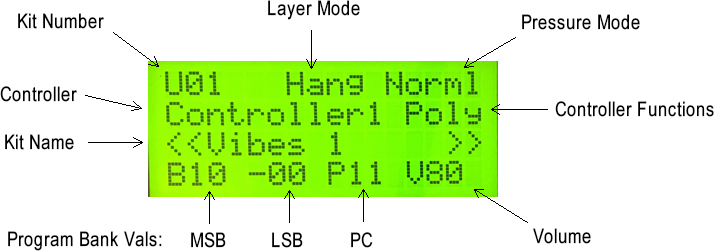
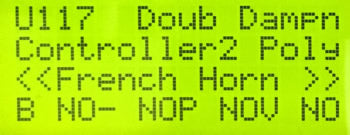
LAYER MODE
Layer Modes tell the malletKAT how to control its sound layers. These layers are a part of every User Setup (Kit) and are called CONTROLLER ONE AND CONTROLLER TWO. These Controller Layers can be total independent, split on the keyboard, layered, velocity shifted or alternated. Your screen will have one of the following:
Hang = Hang Mode
Splt = Split Mode
Doub = Double Mode
Mel1 = Melody Chord Mode 1
Mel2 = Melody Chord Mode 2
Mel3= Melody Chord Mode 3
VelS = Velocity Shift Mode
Alt = Alternate Mode
These Layer Modes are described in detail in the User Setup Playing Modes section.
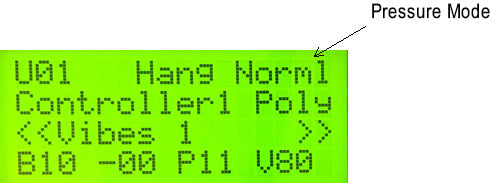
PRESSURE MODE
The malletKAT can detect continuous pressure on a pad. This gesture of applying pad pressure can be interpreted by the malletKAT to perform specific functions such as mallet dampening, dead stroking or aftertouch. Your screen will have one of the following:

Norml = Normal
Dampn = Dampen
Aftch = Aftertouch
DeadS = DeadStroke
These Layer Modes are described in detail in the User Setup Playing Modes section.
CONTROLLER
On the second line of the Display, you will see the word “Controller” followed by 1 or 2. Whenever you edit the malletKAT, you will need to know what Controller you are working on. Any USER KIT parameter changes you are making only apply to the Controller that shows on this screen.
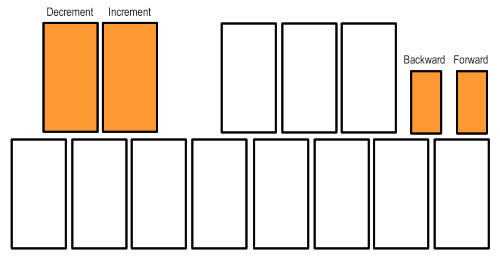
Switching Between Controllers
You can change what Controller you are using by stepping on the EDIT, and while held down, tap the INCREMENT or DECREMENT pads (C# or D# on the highest octave). The display will toggle the Controller Number.
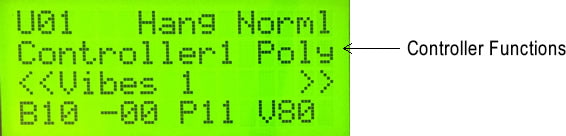
CONTROLLER FUNCTIONS
Every Setup has two Controller Layers, and each Layer can have its own assigned Function. Remember also that they can be layered in DOUBLE Mode or accessed independently in HANG Mode.

These are the Controller Functions:
Poly = Polyphonic Mode
Mono = Monophonic Mode
RTC = Real Time Controller
RT+V = Real Time Controller Plus Velocity
PTW = Pitch Wheel Controller
CTLA = Virtual Control Wheel A
CTLB = Virtual Control Wheel A
CTLC = Virtual Control Wheel A
Polyphonic and Monophonic modes are described in the User Setup Playing Modes section. Real Time Controllers, Pitch Wheel, and Virtual Wheel Controllers are slightly more advanced features that are described in the Full Programming Guide.
KIT NAME
Every User Kit has a 16 character name to help easily identify it, and will be displayed in both User Mode and Chain Mode. These names can be easily changed when editing the User Kit.
PROGRAM BANK VALUES
When a User Kit is first selected, the malletKAT sends a Program Change command to the external sound source indicating which patch is to used. This command is comprised of three values: MSB, LSB, and Program Change Number (PC). For more information on Program Changes, see the section Understanding External Synthesizer Program Changes.
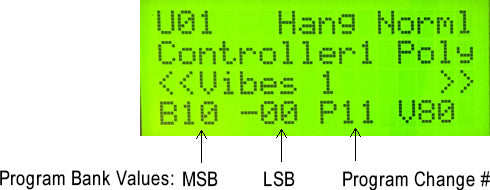
VOLUME
The initial MIDI volume is also sent when a User Kit is first selected. Establishing an initial volume level is helpful to both “balancing” patches that may not be at equal levels, and to establish a baseline for bringing volume levels up or down with a controller pedal.
4.Important Settings Everyone Should Know
The feature set for the malletKAT is quite deep. Throughout the years, we have seen a pattern of common questions coming to us through phone calls, emails, and social media. This section has those questions… and answers.
If the question and answer is not here, we hope this section points you in the direction of where to look deeper.
4.1.How to Access & Edit malletKAT Settings
There are a few basic editing concepts that must be understood if you ever want to make any changes to the malletKAT.
All settings on the malletKAT can be accomplished directly on the instrument without having to put down your mallets. There is no need for any additional hardware or software. Instead, editing any settings in the malletKAT requires inserting a foot switch (or sustain pedal) into the Edit FTSW jack on the back panel:
Unless the Edit footswitch is depressed, the malletKAT is always in “performance mode”.
What does this screen say? Refer to the Reading The malletKAT Screen section
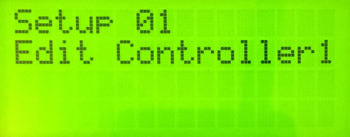
When editing the malletKAT, the Edit Footswitch must be held down the entire time.
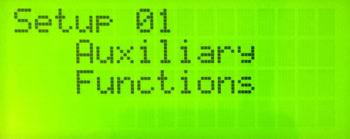
When in “Edit mode” the first screen defaults to this:
All editable parameters fall into one of two categories:
- Global Settings – settings that affect everything, like pad training, chain programming, etc…
- or Kit Settings – settings that apply only to the User Setup you are currently using, like MIDI channel, MIDI volume, Min/Max Velocity settings, etc…
Remember: “Kit” is another name for “User Setup”
 malletKAT Express
The most commonly accessed editing parameters/settings appear underneath the “white keys” across three octaves on malletKAT.
These white keys contain functions and settings like OCTAVE, CHANNEL, SETUP, VOLUME, etc, etc. When you step on the Edit Footswitch and hit one of these pads, you are now editing that function.
All of these functions are discussed in the section Editing Functions – Pad Shortcuts

Any editable parameters will be blinking. Use the Increment and Decrement pads to raise and lower the values. If there is more than one parameter on a given screen, use the small Forward/Backward pads to switch between them.
As an example, if you wanted to change the octave (shift the accessible octave range of the instrument) you would step on the edit footswitch and while held down, tap on the E pad (on the highest octave). Then you would tap on the D# (increment pad) to raise the octave. Do all of this while the edit footswitch is held down.
Some of these “white key” function keys are layered, meaning that if you strike that pad more than once, additional parameters will appear.
All of these settings are discussed in the section Editing Functions – Pad Shortcuts
malletKAT Express
The complete set of editable parameters for the malletKAT are accessed using the lowest “D” and “E” pads – which correspond to the Global Auxiliary, and Kit Setup (Auxiliary) editing areas. These are discussed in the Full malletKAT Programming Guide

OTHER EDITING TIPS:
Several settings can be changed during one time of depressing the EDIT Footswitch
All changes you make to your Setups are saved immediately when you change them. You do not need to do any specific action to “save” your changes – it happens automatically.
To recover from unwanted changes, simply hit “Cancel” (A# on the highest octave). Changes that you have made to a Setup may be undone as long as you have not gone away from this Setup to another one.
You are able to copy the current Setup to any other Setup using the “Setup Copy” pad. To do this, perform the following steps
- Hit the “Setup Copy” pad (G# on the highest octave) while the Edit is pressed.
- Enter the digits of the Setup number to which you would like to copy the current setup.
- Hit the “Setup Copy” pad again to see the con rmation screen.
- Hit the “Setup Copy” pad a third time to perform the copy. After the copy is performed, the Setup that you copied to is the current Setup.
4.1.1.malletKAT EXPRESS - Accessing Editing Functions
All of the malletKATs, regardless of size, contain the same functions.
Because the Express does not have the third octave required to access editing the same way that the Pro and Grand can, we need to “trick” the Express in order to get at these functions.
On the Express, the label that shows the edit definitions for this octave appear ABOVE the pads, instead of below. When you step on the Edit Footswitch AND the Sustain One Footswitch at the same time, the Express thinks you are tapping on the third octave. That’s all there is to it!
Once you have engaged an editing function (e.g. Global Auxiliary Functions), you can let go of the sustain pedal.
On larger malletKAT’s, the “black” pads allow you to get at numbers from 1-10. This is not unfortunately not possible on a two octave Express.
If an octave Expander is attached to the Express, then the editing functions behave as a three-octave malletKAT.
4.2.Switching Between Factory Setups, User Setups, and Chains
Unless the malletKAT is in “Edit Mode”, meaning that the Edit Footswitch is being held down – then the malletKAT is in “performance mode” and is ready for you to play.
There are three possibilities, or “Banks” that the malletKAT uses for performance: User Kits, Factory Kits, or Chains.
User Kits or Factory Kits are differentiated by the “U” or “F” appearing next to the Program Number in the upper left corner of the malletKAT screen. Chain Mode is a little more obvious.
To switch between these Banks:
- Step on the Edit footswtich and hold it down
- Tap the BANK SELECT “white key” (F natural)
- Use the Increment or Decrement pads to select the correct bank

4.3.Changing User Kits - a Shortcut!
If you have grown weary of practicing single stroke rolls to move from User Setup 23 to User Setup 95, use the following shortcut:
Looking down at the malletKAT, you will see that the “white” keys represent the most common programming functions, and that ten of the “black” keys (accidentals) have been assigned individual numbers. These are described in the section Editing Functions – Pad Shortcuts
Step on the Edit Footswitch and hold it down… Tap on the SETUP pad (second highest C natural) and then the numbers corresponding to the User Setup you want.
Because of the size of the malletKAT Express, this shortcut is not available. Express users can get around this by using Chains. This is described in the section How to Create a Chain
4.4.Training Your malletKAT To Your Playing Style
 A Note of Caution: While the malletKAT can distinguish between 127 different velocity levels from your mallets, playing excessively hard CAN and WILL damage your instrument. If you find you need to play louder, first try using a more powerful amplifier!
Training the Pads
One of the most important design features of the malletKAT is its ability to have the pads be trained by the user for personal dynamic response. Every player has their own idea of what a soft hit is and how hard they ultimately want to play. By teaching the malletKAT your playing style, the instrument learns the way you play and provides the widest dynamic response possible for you.
Training your malletKAT is NOT the same thing as adjusting sensor thresholds. Threshold adjustments are used to change the overall sensitivity of the sensors under the pad. If your instrument does not seem to respond well to soft hits, or is falsely triggering (playing notes without you hitting the pad), then you should adjust the sensor thresholds before you train the malletKAT.
There are three ways that the malletKAT can be trained.
GLOBAL TRAINING, where you hit one pad soft, then hard to give the overall dynamic response for the entire instrument.
GROUP TRAINING, where each octave on the malletKAT is trained separately.
INDIVIDUAL PAD TRAINING, where individual pads can be trained separately from the rest of instrument.
These last two features can be invaluable if one note starts to behave differently or if an expander octave was purchased at a different time from the original and its sensitivity characteristics are slightly different from the rest of the unit.
Sensors can vary slightly from each other. Also over time, the sensors response can vary as well. The pad training provided on the malletKAT eliminates the problem. The reason for this is because the malletKAT can “see” 255 levels of dynamics. MIDI only has 127 levels. When you hit the pad soft and hard in the training process, you set the minimum and maximum levels. These values are then imposed over the MIDI dynamic response curves. The slight variations possible from sensors are masked because the malletKAT is twice as dynamic as MIDI.
Global Auxiliary Shortcut #07
GLOBAL PAD TRAINING (TO TRAIN ALL PADS)
You can train the entire instrument for your personal dynamic response. This training affects the entire instrument, and all pads receive the same response values. Once you enter Global Auxiliary Screen #7, the malletKAT will prompt you to hit any pad to continue with the training process.

When you “hit a pad to continue”, the malletKAT will ask you to hit any pad softly.

For best results, before registering a soft hit, you should release the Edit footswitch. If you choose to abort training, tap the Edit footswitch BEFORE finishing this process…
When you train a soft hit, after a moment will ask you to hit any pad hard. This completes the global dynamic training.
Global Auxiliary Shortcut #79
OCTAVE PAD TRAINING (GROUP TRAINING)
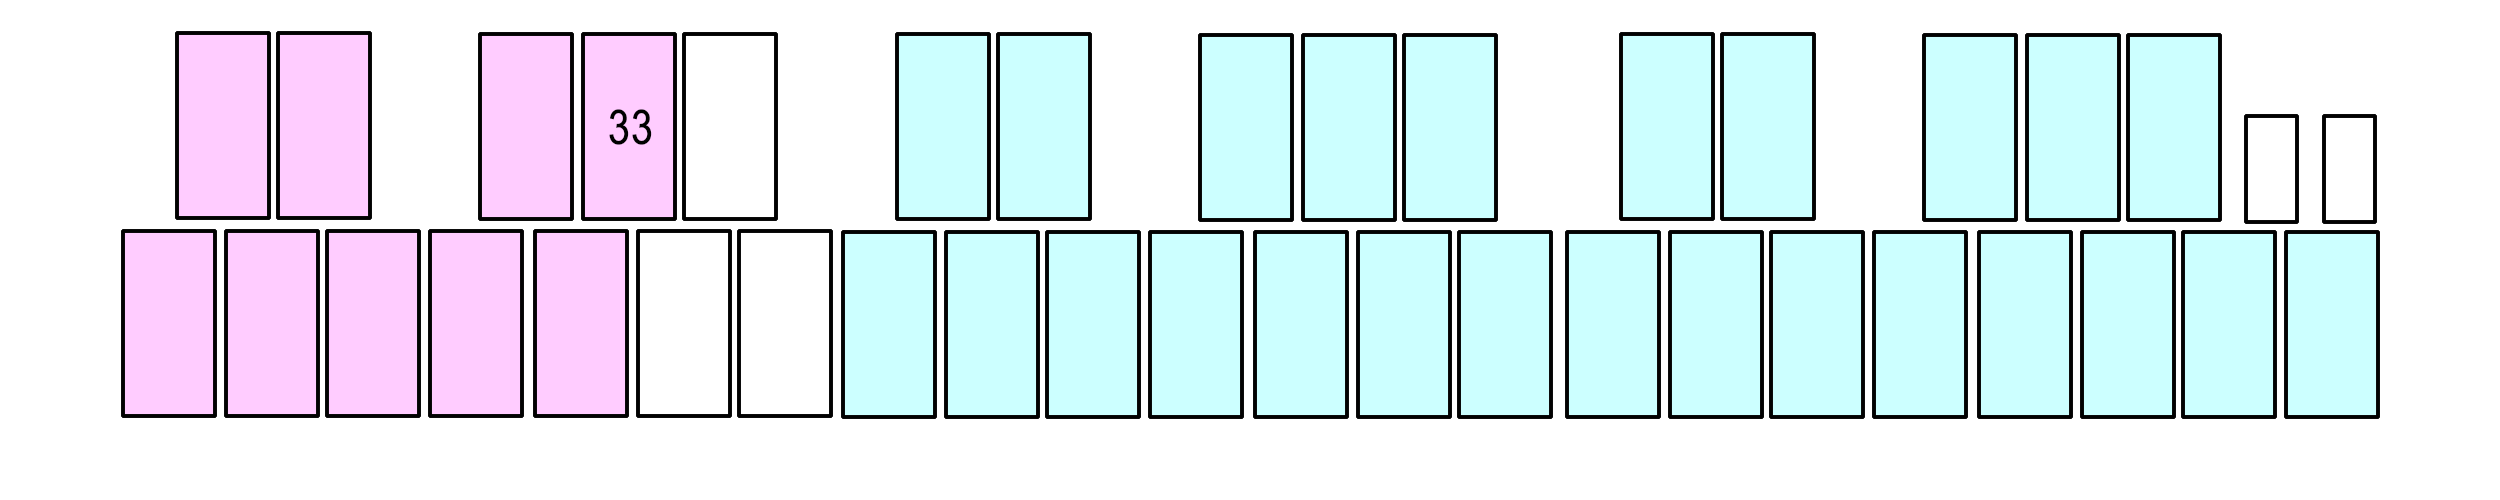
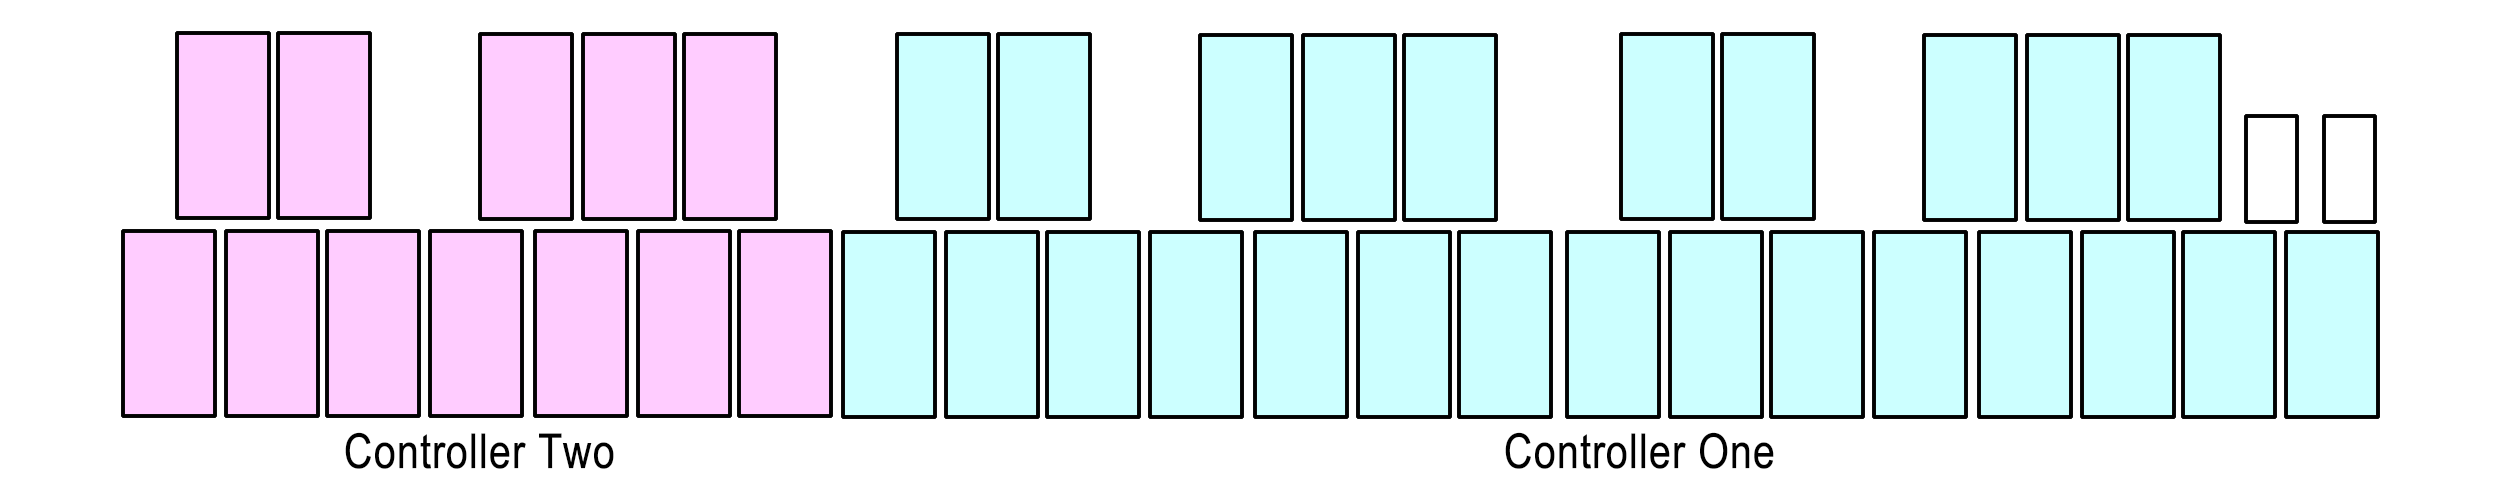
The sensors for the malletKAT are divided into octaves. For training purposes, each octave is assigned a GROUP letter. Since a malletKAT can be expanded to five octaves, there are five total groups, assigned as follows:

It is easiest to think of this going from right to left. Therefore:
- The MASTER OCTAVE (the one with the LCD screen) is always Group E (C2).
- Any Octave Expanders attached will be attached on the left end, and will be Groups A & B
- A four octave malletKAT Grand will have Groups B, C, D, & E
- A three octave malletKAT Pro will have a Groups C, D & E.
- *The malletKAT EXPRESS does not have C0 (Group C), since it can only be expanded to four octaves.
On Global Screen #79, the malletKAT asks you to hit any pad to train octave groups. After striking any pad in the octave you wish to train, a Group Letter appears along with the appropriate C-natural (or F#) pad to train.


For best results, before registering a soft hit, you should release the Edit footswitch. If you choose to abort training, tap the Edit footswitch BEFORE finishing this process…If you want to train a different Group, tap on the Forward/Backward pads until the Group letter that you want to train appears.
The malletKAT will ask you to play a soft hit and then a hard hit on the C-natural (or F#) of the octave that you chose. After the malletKAT finishes calculating the results, it automatically moves to the next Group and asks you to hit the next C for training. This process will continue repeatedly until you release the Footswitch to stop the training process.
The malletKAT will ask to train ALL five octaves even if you do not have them attached. Skip that Group if you only have a three or four octave malletKAT.
Global Auxiliary Shortcut #85
INDIVIDUAL PAD TRAINING
It is also possible to train up to sixteen individual pads. These pad training values are stored in “INDIV Pad Train A, B, C………P”. Go to Global Auxiliary Screen #85, keep the Footswitch down and use the Forward function pad to scroll through these 16 INDIV PAD TRAIN Letters.
Pick a Letter (slot) for storage, then tap the pad that you want to train.
— If the individual slot has not been assigned a pad, the screen will display “—-“.

— If you have already chosen a pad for this slot, it will appear here. You can overwrite it by choosing different pad.

The malletKAT will ask you to hit the pad soft, then hard.
For best results, before registering a soft hit, you should release the Edit footswitch. If you choose to abort training, tap the Edit footswitch BEFORE finishing this process…These values will be stored in that INDIV PAD Letter for the mallet pad that you just played. Go to Global Screen #80 and use the function pad to find the training values in the PAD Letter. The name of the pad (the key) that has been individually trained is now displayed in that Pad slot.
If the same pad is trained in more than one slot, only the training data from the last slot is used.
To Reset an Individual Pad Training Slot, follow these steps:
- While holding down the Edit footswitch, scroll through the Global Auxiliary screens to the pad you wish to reset.
- Release the Edit footswitch. The above screen should remain.
- Tap the pad to reset it. (In this example, you would tap the G-natural in Octave Group D (notes C1 to B1 – see Octave Group definitions earlier in this section)
- Individual Pad Training slot C is now reset.
To Reset all Individual Pad Training Slots, you must reinitialize the instrument.
Global Auxiliary Shortcut #80
Viewing and Manually Adjusting your Pad Training results:
After training, you can both view and manually adjust values recorded from each Octave Group or Individually trained pad.
ALL training results share the same Global Auxiliary Screen (#80). To scroll through the different results, use the Forward/Backward pads until the second line is blinking. Then use the Increment/Decrement pads for scrolling.

To manually make changes to the training results, use the Forward/Backward pads until the Low or High training value is blinking. Then change the values with the Increment/Decrement pads.
If you globally trained your instrument, all five Octave Groups (A-E) will have the same Low/High level settings. Remember that if you make manual changes here, you will need to adjust each octave separately. The Octave Groups are explained in detail earlier in this section.
Any unassigned Individual Pad Training slots will be listed with levels of “—”

If you have individually trained pads, the actual Note name and Octave will appear here instead a slot letter (A-P). This is for convenience. Remember the Octave number here is NOT a MIDI octave, but the Octave Group this note belongs to. The Octave Groups are explained in detail earlier in this section.

Notes on Training Your malletKAT
Trust your ears and your playing dynamics. The values may look different from octave to octave, but the response can be the same. This is because there is a different sensor on each octave (and a different section of circuitry controlling it). By training each octave separately, the 128 MIDI velocity response levels should be about the same. This function dramatically increases the evenness across the entire malletKAT.
Remember too, that a User Kit can be assigned an alternative Velocity Curve that will change the MIDI velocity value sent as a result of striking the pad. The default Velocity Curve (Curve #1) is linear – meaning that there should be an even dynamic response between your softest hit and your hardest hit.
4.5.Adjusting Pad Thresholds
If you are playing your malletKAT in a high altitude area or in varying colder and warmer environments, you may need to raise the thresholds levels of the entire instrument because the sensors are sensitive to pressure above sea levels.
This feature is also used to increase or decrease the general sensitivity of the entire instrument. If your malletKAT begins to falsely trigger (playing itself, rapid fire pitches), you simply need to raise the thresholds. Conversely, if your malletKAT does not seem to respond to softer hits, you may need to lower the thresholds.
Adjusting sensor thresholds is NOT the same thing as training your malletKAT to your personal dynamic levels. Threshold adjustments should be done only if your instrument does not seem to respond well to soft hits, or is falsely triggering (playing notes without you hitting the pad).
AUTOMATIC PAD THRESHOLD
By simply pressing and releasing the Edit footswitch, the malletKAT performs a Pad Threshold Recalibration. This temporarily adjusts the pad thresholds (as if you just turned on the malletKAT). This setting is not permanent. If you want to save a new permanent threshold level, perform the Global Threshold Adjust procedure described below.
Don’t lean on the pads when you step on the edit footswitch as this will raise the thresholds of the pads, making them very in-sensitive. If this should happen, press and release the Edit again (without touching any pads) and this will make the pads playable again.
To Change the malletKAT Pad Sensitivity Thresholds GLOBALLY
Step on the Edit footswitch and Sustain 2 pedal at the same time. The display changes and says “Threshold Adjust”
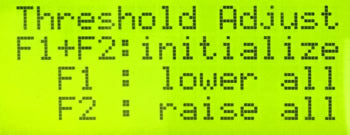
Use the BACKWARDS pad to lower the threshold to make the instrument MORE sensitive.
Use the FORWARD pad to raise the threshold to make the instrument LESS sensitive.
Be careful not set the thresholds too low, or the instrument may start playing itself. If you raise it up too high, it will take a harder hit in order to get the instrument to respond.
To REINITIALIZE your malletKAT Pad Sensitivity Thresholds back to “safe” settings
Step on the Edit Footswitch and the Sustain 2 at the same time, and while they are depressed hold down both the “Backward” and Forward” small Function pads. Your malletKAT will read the present idle levels of your Pads and put your Thresholds at safe settings for you.
Understanding the Threshold Readings / Troubleshooting an Individual Pad
If you have a pad that is not behaving well, start by comparing it’s Actual Threshold value to others. It is normal that the threshold numbers of each pad may differ slightly.
If the individual pad is off by a significantly larger value (meaning an “oversensitive” pad) – this can indicate that the pad is misaligned on the sensor, or the pad is adhered a little too tightly. This can happen when the instrument is subjected to hot or cold. In this situation, you can try the following:
- Reinitialize the instrument to remove any saved threshold or training settings (Edit footswitch and press down both Forward/Backward at the same time).
- Unplug the instrument completely and turn it on and off to make sure there’s no capacitance being stored.
- Take your fingers and gently peel no more than an 1/8″ all the way around the pad. If you peel it too far, you will have trouble getting it reattached!!
- Turn the instrument back on and check that pad threshold against others again.
If the thresholds don’t appear to be to far off from one another, then simply try training the individual pad. Use your ears and best judgement when making adjustments.
If you are still not satisfied with the pad’s response, then it is time to order a replacement pad from Alternate Mode. Feel free to contact us for support if you have any questions.
To Check or Adjust the Threshold of Individual Pads
If you are sure that a pad is not is either NOT as sensitive or TOO sensitive compared to the others, start by checking it’s threshold settings.
Global Auxiliary Shortcut #05
INDIVIDUAL PAD THRESHOLD ADJUSTMENT
In the Global Auxiliary screen, select 0,5 from the “black key” number pads or tap the Forward pad five times.
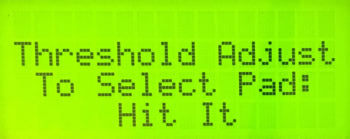
You can now tap any pad to see it’s current threshold numbers. You can also tap different pads to compare values…

The individual pad threshold is a numerical reading from the sensor. The threshold can be changed by raising or lowering the sensitivity margin using the Forward/Backward function pads.
Your Function Pads Can Be Adjusted, Too!
Global Auxiliary Shortcut #83,84
ADJUST THRESHOLD MARGIN FORWARD/BACKWARD FUNCTION PAD
The Function Pads F1, F2 (Backwards/Forwards) are set to a higher threshold level than the rest of the instrument. The default setting is 45. You can adjust the threshold here by using the Increment/Decrement pads.
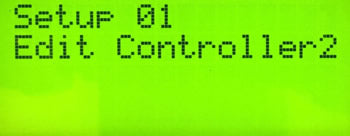
4.6.How to Program Controller Two to Use a Different Sound
Placing a different sound on a User Kit’s Controller Two than User Kit’s Controller One is one of the most often asked questions. This “Two MIDI Controllers In One” feature of the malletKAT is required for all of our unique User Setup Playing Modes.
Working with Controller Two is very similar (if not identical) to working with Controller One. So you will find the answers to both in the section Setting Up The Controllers
4.7.Shifting the Octave Range
(See Section 7.1)
To change the playable octave range of either Controller 1 or Controller 2, use the Edit footswitch and OCTAVE key shortcut (E natural)

Remember, Controller One and Controller Two are independent, so you can also “extend” the playing range of your malletKAT using HANG mode! For example, if you want to access the range of a five octave marimba or an eight octave piano…
Configure your User Kit such that:
- Controller One and Controller Two are using the same sound
- Controller Two is offset up or down one or more octaves
Now when you hold down the Sustain 2 pedal, your malletKAT is temporarily shifted into a different octave range!
4.8.Adjusting MIDI Volume
(See Section 7.1)
MIDI Volume refers to the volume setting of the sound patch (Program) you are using. This volume setting is sent out to external modules or the internal sound card in the first moment of changing to that particular User Setup.
To change the MIDI Volume of either Controller 1 or Controller 2, use the Edit footswitch and VOLUME pad shortcut (B natural)
This Volume control setting is sent out immediately after the user kit is selected MIDI Volume can also be adjusted during performance with a Controller Pedal. This can be found in the section Using the Foot Controller Inputs
4.9.Adjusting Note Sustain (Gate Time)
(See Section 7.1)
Proper control over gate times is essential in creating expressive nuances in your playing without melody notes being too short or “choppy” sounding, or too long and bleeding into each other.
To learn more about how the malletKAT uses Gate Times, please refer to the section Working With Gate Settings
4.10.How to Create a Chain
A CHAIN allows you to arrange User Setups (Kits) in any order. This function is very useful in live situations because you can organize in advance what sounds you might need in a song or performance without having to step through all of the User Setups you do not need. You can either step through the Chain’s Steps by hitting the FORWARD or BACKWARD function pads, or you can attach a footswitich to one of the two Foot Controller inputs and configure it to step through the chain. Refer to the section Using the Foot Controller Inputs for more information.
There are 16 Chains in total. Each Chain can have up to 16 User Setups. You can also link Chains together or set up a Chain as a Loop.
Creating/Editing a Chain
Global Auxiliary Shortcut #46-49
In the Global Auxiliary, you determine What Chain you are editing (#46), which one of the 16 Steps you are editing (#47), and what User Kit (#48) you want in the slot. After you choose one of the 128 User Kits, you can also tell the malletKAT to advance to the NEXT CHAIN or to LOOP the Chain that you are editing.

The third line on this screen indicates whether or not the malletKAT is currently in Chain Mode. This will automatically change when enabling Chain Mode.
Enabling Chain Mode
Step on the Edit footswitch and tap the Bank Select pad, and then the INCREMENT or DECREMENT pad until the screen reads “CHAIN SETUPS Have Been Enabled”. Release the Footswitch to play.
When you Enable the Chain Mode, the first character on the display in Play Mode tells you what Chain you are in and what Step you are in. For example, C01-02 means that you are in Chain number 1, and that you are in the second step.
The screen gives the Kit Name, but not the User Kit Number. If you want to know what User Kit you are in, step on the Edit Footswitch and hit the Setup Pad (low C on the highest octave). The screen will display the current User Kit Number.
Selecting The Chain To Use — SHORTCUT!
When Chain Mode is Enabled, it is possible to quickly change Chain Numbers. If you want to go to a different Chain, hold down the Edit Footswitch, hit the Global Auxiliary Pad then hit the INCREMENT or DECREMENT pad to cycle through the Chains. Release the Footswitch to play.
4.11.How to Create a Split
Creating a split on your malletKAT requires configuring BOTH Controller One and Controller Two in your User Setup.
If you are unclear on how to create two different Program patches (sounds) on these two controllers, please refer to the section Setting Up The Controllers.
Creating a Split
A split is created on User Kit by defining two things: The lowest note on Controller One, and the highest note on Controller Two.
The range of a five-octave malletKAT (the maximum with Octave Expanders) is 61 pads.

A three-octave malletKAT Pro, then, uses these pad numbers:
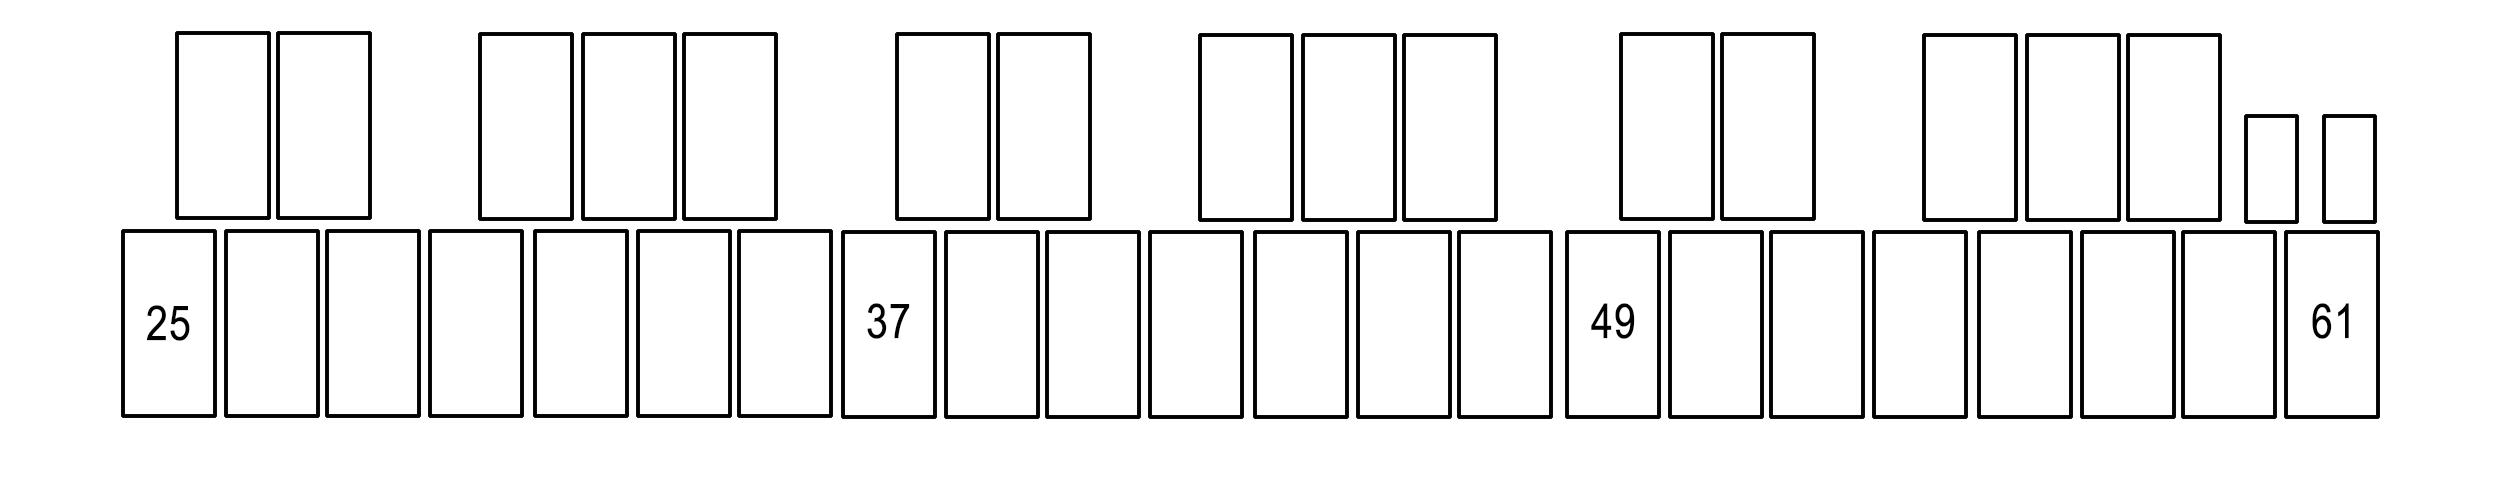
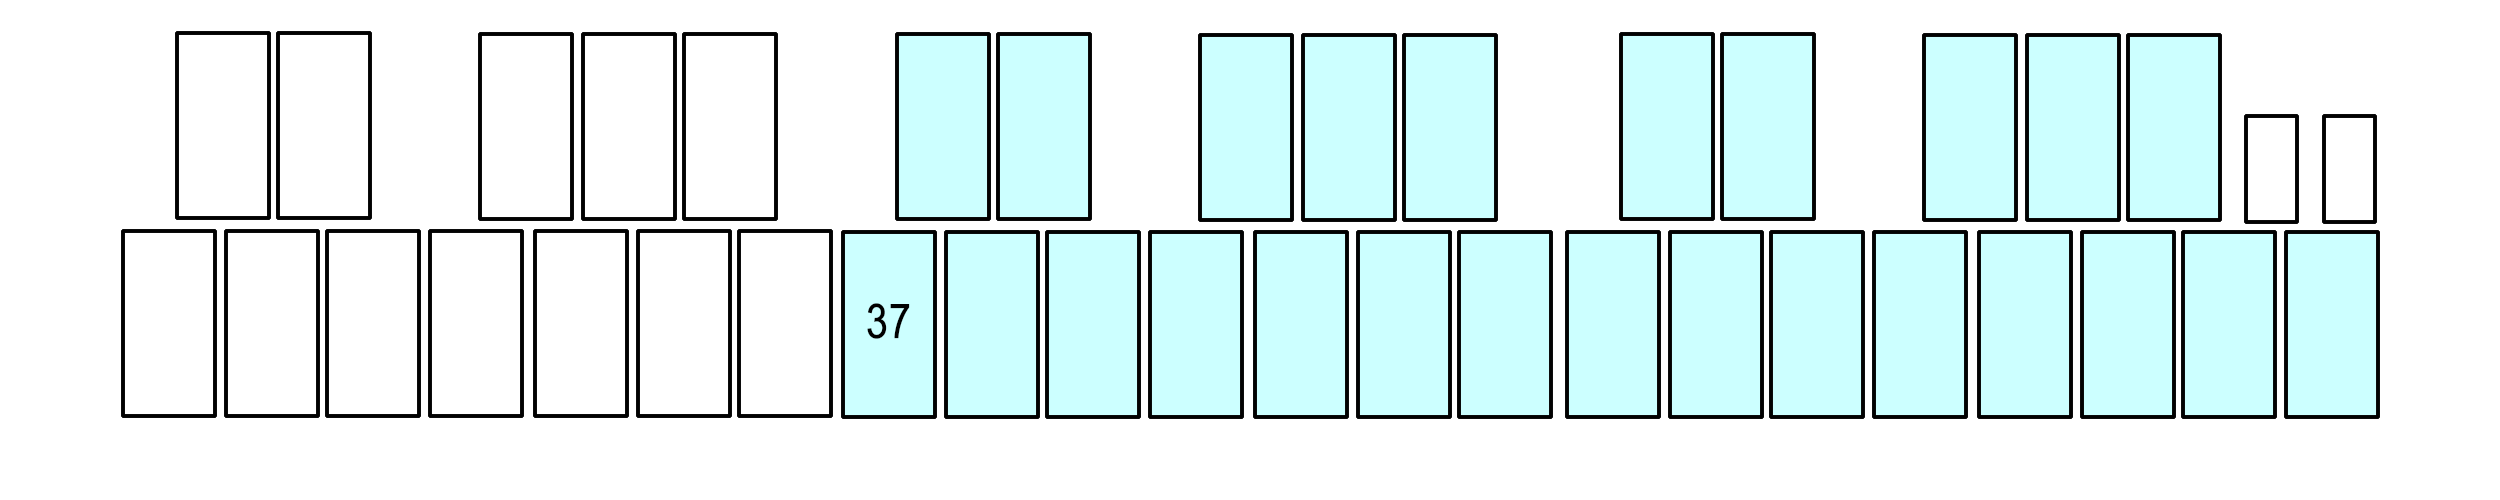
Set Controller One low note:
- Step on the Edit footswitch and use the INCREMENT/DECREMENT pads to select Controller One
- With the Edit footswitch held down, tap the Split shortcut pad (D natural)
- Tap the lowest note for the Split (you do NOT need to manually enter a pad number). The edit screen will indicate the pad number you selected.
- Release the Edit footswitch
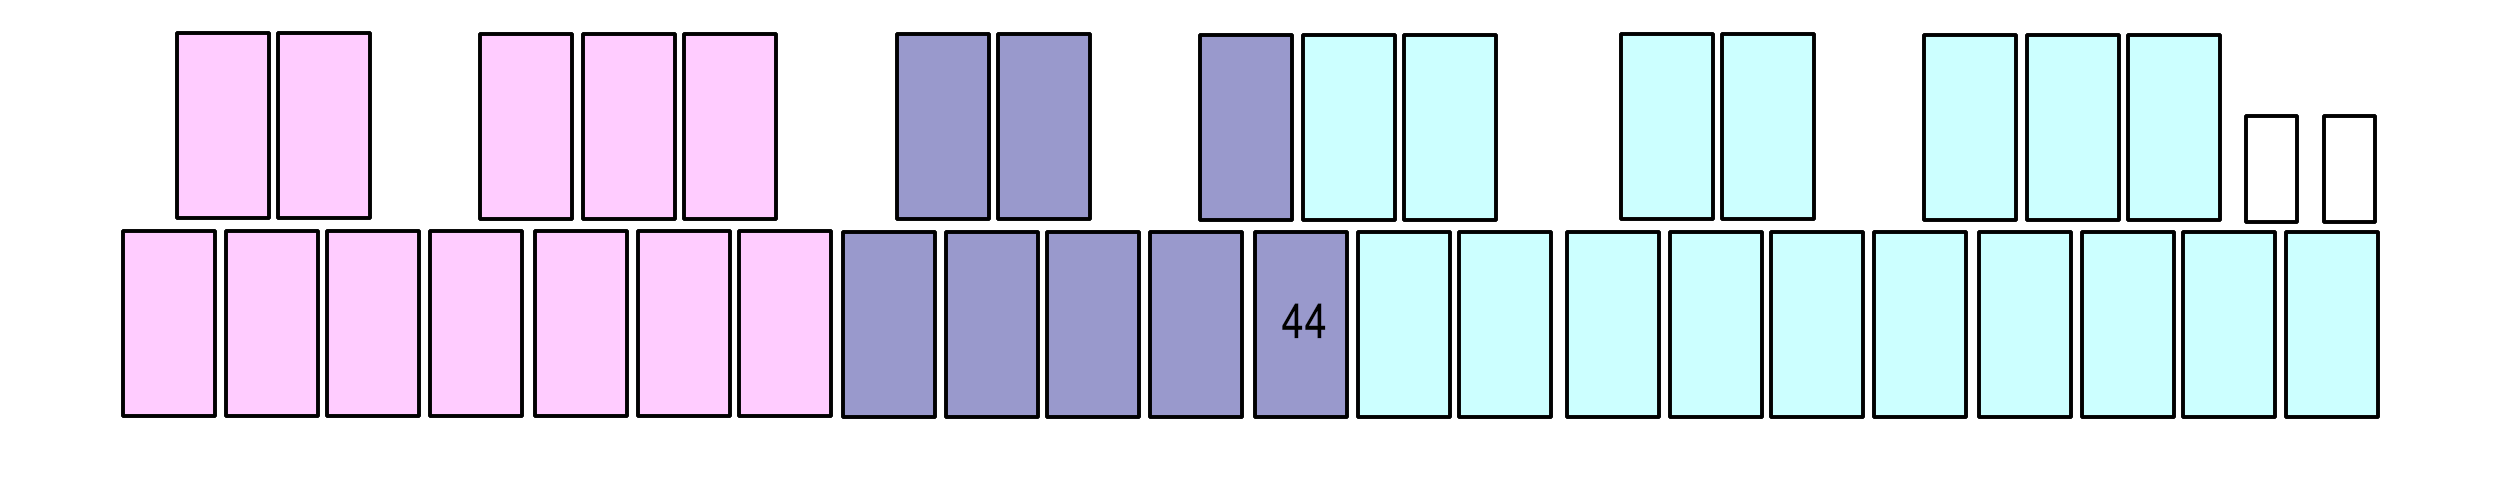
Set Controller Two high note:
- Follow the same procedure you used for Controller One. The edit screen will indicate the pad number you selected.
- Release the Edit footswitch

On the User Kit “Play Mode” screen, the Layer Mode is now set to Splt (Split Mode).

Depending on where you set your Controller’s Split points, a Split can also create an overlap between Controllers (both controllers play at the same time), or a “dead zone” between controllers (neither controller will work).
4.12.The malletKAT is Not Retaining Changes When Turned Off
The malletKAT has the ability to protect it’s memory to allow you to make temporary changes “on the fly” during a performance, but then reset itself after a power cycle.
To toggle this setting off and on,
- Step on the Edit footswitch
- Tap the Global Auxiliary pad shortcut
- Tap the FORWARD function key once
Then use the Increment/Decrement pads to toggle the Permanent Memory Lock
4.13.Protecting/Saving the malletKAT Memory
If you have made a lot of customizations to your User Kits or Chains, you will want to create a backup of these settings that can then be overwritten.
The malletKAT accomplishes this by sending/accepting a specialized MIDI System Exclusive (SysEx) file to/from an external device. You will need a device, app, or computer program that can accept, store, and transmit MIDI SysEx files.
Resources for MIDI
Windows PCs:
- MIDI OX (http://www.midiox.com) (also has MIDI monitoring capabilities) **There are reports that MIDIOX buffer settings must be adjusted to transmit to the KAT
- SendSX (https://www.bome.com/products/sendsx)
Mac OS X:
- SysEx Librarian (https://www.snoize.com/SysExLibrarian/)
- MIDI Monitor (https://www.snoize.com/MIDIMonitor/)
iOS Devices:
- Sysex Base
- MIDI Quest (also has MIDI monitoring capabilities)
Android Devices:
- SYS-Lib
- MIDIscope
- USBMidi
Saving Your malletKAT Settings (DATA DUMP)
To transmit a sysex file for storage:
- Make sure you have connected a MIDI cable to the REAR MIDI OUT jack to the MIDI IN (or USB port) on your device
- Step and hold down the Edit footswitch and tap the Global Auxiliary pad shortcut
- Tap the Forward function pad three times to scroll to the DATA DUMP Screen.
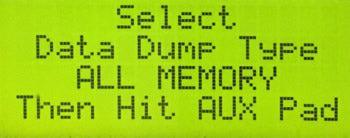
Use the Increment/Decrement pads to select one of the following types of Data Dumps:
- Global — Dump Global Settings only
- All Memory — Dump Everything
- All Kits — Dump User Kits only
- Chains & Reassignments — Dump Chains and Reassignment settings only
- User Kits 1…127 — Dump Individual User Kits
When you have selected the Dump type, tap the Global Auxiliary pad again to transmit the SysEx file.
Restoring Your malletKAT Settings:
To receive a Data dump sysex file and restore your settings:
- Make sure you have connected a MIDI cable to the MIDI IN jack to the MIDI OUT (or USB port) on your device
(if you are using a MIDI-to-USB cable, make sure it specifies that it is bi-directional) - Step and hold down the Edit footswitch and tap the Global Auxiliary pad shortcut
- Tap the Forward function pad four times to scroll to the DataDump Recieve Screen. Make sure this is set to ENABLE
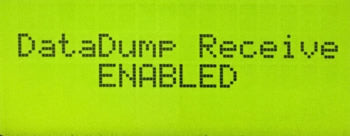
You can now send the sysex file from your device to your malletKAT
4.14.Reinitializing the malletKAT
To reinitialize the malletKAT to factory settings:
- Step and hold down the edit footswitch
- With two fingers, press and hold down both the small FORWARD and BACKWARD pads
- The screen will tell you to hold down the A#/Bb pad next to these keys to confirm
5.User Setup Playing Modes
This section describes the various performance modes available to each of your User Kits (Setups)
5.1.Pressure Modes (Normal/Dampen/DeadStroke/Aftertouch)
Pressure Modes in this section are accessed from the “white key” shortcut pads.malletKAT Express users must also use the Sustain One pedal to access these. See the notes on editing with a malletKAT Express
The malletKAT can detect continuous pressure on a pad. This gesture of applying pad pressure can be interpreted by the malletKAT to perform specific functions such as mallet dampening, dead stroking or aftertouch.
On the first line of the display on the far right of the screen, you can see the Pressure Mode assigned to this User Setup.
NORMAL Mode (Norml)
When in NORMAL mode, applying continued pressure causes notes to be sustained. (this is like pressing down on a keyboard). The note will shut off after the pressure from the mallet is released (and the gate time lapses)
You can access the Norml mode by stepping on the EDIT Footswitch, and while held down, tap the bottom G-natural shortcut pad.
DAMPEN Mode (Dampn)
This represents the Dampen Pressure Mode, where natural dampening techniques cause individual notes to be quieted. This is like the dampen technique used on a vibraphone/vibraharp.
You can access the Dampn mode by stepping on the EDIT Footswitch , and while held down, tap the bottom A-natural shortcut pad.
Dampening “Fine Tuning” Control Screens
There are a few Global Auxiliary control screens that are used to help the malletKAT to interpret acoustic dampening gestures. Because mallet players use different sticks and apply pressure to the mallet pad differently, sometimes adjustments must be made in the software to help mimic and interpret these strokes.
AFTERTOUCH (Aftch)
This represents the Aftertouch Pressure Mode, where applying continued pressure causes Aftertouch commands to be sent to your sound source. Aftertouch is continuous controller data that can be routed to do many different things within the sound module.
You can access the Aftch mode by stepping on the EDIT , and while held down, tap the B-natural shortcut pad.
Aftertouch “Fine Tuning” Control Screens
There are a few Global Auxiliary control screens that are used to help the malletKAT to interpret aftertouch gestures. Because mallet players use different sticks and apply pressure to the mallet pad differently, sometimes adjustments must be made in the software to help mimic and interpret these strokes.
DEAD STROKE (DeadS)
This mode simulates the common dead stoke technique that is used with marimba and vibraphone players.
When a dead stroke gesture is detected, these notes are sent out on a different MIDI channel so that dead stroke samples can be accessed.
If you have a SAMPLER that has samples of marimba dead strokes, this mode will become invaluable. Unfortunately, this may be hard to come by. When an electronic instrument is made entirely on the dead stroke sound, this new feature in the malletKAT will be ready to represent this new articulation.
You can access the DeadS mode by stepping on the EDIT footswitch, and while held down, tap the bottom A-natural shortcut pad (“Dampen”) TWICE. The Dead Stroke gesture can also be creatively used to access different sounds on multiple channels that are transposed.
The Dead Stroke sends the note data to the actively kit assigned Reassignment Number (a Reassignment is a special keyboard layout arrangement where each note can be assigned to any note number along with it’s own MIDI channel.
You can control the delay time before the Dead Stroke sounds in the Global Auxiliary Screens (DEAD STROKE COUNT).
A note about the Sustain Pedals and Pressure Modes:
When a User kit is using “Normal” pressure mode, the Sustain pedals operate by sending a signal on MIDI Continuous Controller #64 (CC#64). This is the recognized MIDI standard for representing a sustain pedal, and allows a note/key on a regular keyboard to sustain even after the finger has been lifted from the key. For mallet players, think of this more like striking a vibraphone bar with the pedal down…
When a User Kit is using a pressure mode other than “Normal”, the sustain pedal will not send a MIDI CC#64 value, but instead just suppresses the sending of a MIDI “Note Off” command to allow the malletKAT to recognize the gesture (dampening, dead stroke, aftertouch) and manipulate the notes accordingly.
5.2.Monophonic/Polyphonic Modes
Polyphonic and Monophonic modes are two of the Controller Functions for each User Kit. The other controller functions: RTC, Pitch Wheel, and Virtual Control Wheel are described in their own sections.
Polyphonic Mode is for normal polyphonic playing, and is the “standard default” Controller Function. In this mode, you can play chords, melody, etc.
Monophonic Mode is great for lead lines, or for simulating solo line instruments like ute or trumpet. Only one note will sound at a time in this mode.
You can switch between these modes by stepping on the EDIT footswitch, and while held down, tap the “Mono” (F natural) or “Poly” (G natural) pads.
Adjusting the “Smoothness” of your melody line:
MONO OVERLAP setting in the User Setup’s Kit Auxiliary for setting legato control (this overlaps notes together, programmed in milliseconds).
For Polyphonic Mode, the AUTOGATE setting provides a similar function as MONO OVERLAP bay adjusting gate times depending on your playing speed. Refer to the section Working With Gate Settings for more information.
5.3.Layer Modes
Layer Modes all take advantage of each User Setup’s two separate controllers. Typically, the two controllers are configured to trigger two different program patches, but can also be assigned to the SAME program patch with one controller transposed.

To learn how to configure these two separate controllers, refer to the section Setting Up The Controllers
5.3.1.Hang Mode
In HANG MODE, when you are playing on the malletKAT, you will hear the sounds being controlled by Controller One. When you step on the Sustain 2 pedal, the malletKAT switches to the sound being controlled by Controller Two.
Common uses of Hang mode are:
- To quickly switch back and forth between two distinct sounds.
- To quickly extend the octave range of the instrument by having Controller One and Two use the SAME sound, but offset by an octave
- To use Controller Two not as an instrument, but a MIDI controller for another device. For example, to toggle loops on and off
You can set your User Setup for HANG mode by stepping on the EDIT footswitch, and while held down, tap “Hang” shortcut pad (C natural).
To make it easier to sustain notes properly between the two layers, you may need to assign the sustain pedals to work with either or both layers simultaneously. To read more on this, refer to the section Setting Up the Pedal Inputs.
There is a special HANG mode function built into Controller Two called “INFINITE Gate“. The gate time for Controller Two can be set to INFINITE, meaning that when a note or chord is played with Sustain Pedal 2 down, it will continue to sustain even after Sustain 2 has been released and will continue until the Sustain Two pedal is pressed again. This is the original meaning of the word “HANG”. For more on setting gate times for your controllers, refer to the section Working With Gate Settings
5.3.2.Blend Mode
Blend mode allows the use a foot controller pedal to crossfade the sounds of Controller One and Two. At either extreme of the pedal, only one of the sounds will play. The middle range is a varying degree of both sounds.
To utilize Blend Mode follow these three steps:
1) Set the Layer Mode for the User Kit to HANG.
2) Set up your User Kit Controllers to the sound patches you want to use.
3) Assign Foot Controller 1 or 2 to the BLEND function.
Further details on setting up Controllers and foot pedals can be found in the section Working With User Kits
5.3.3.Split Mode
When you see Splt on the first line on the display, it means that the malletKAT is in SPLIT MODE. This mode allows the malletKAT to play two sounds without having to step on the SUSTAIN TWO . Each of the sounds from CONTROLLER ONE and TWO can have their own SPLIT point on the keyboard. This means that the two sound layers can overlap or split. It is even possible to have “dead” notes between the two SPLIT Zones.
NOTE: SPLIT Mode has a few extra configuration steps!!
Both Controller One and Two need to have their own split points assigned in order for this function to work properly.
To create a split, refer to the section, How to Create a Split
5.3.4.Double Mode
When you see Doub on the first line on the display, it means that the malletKAT is in DOUBLE or “layer mode”. That means that both CONTROLLER ONE AND TWO are active across the entire malletKAT. Both sounds are layered on the instrument.
For convenience, you can configure the Sustain One Footswitch to control the sustaining of both sounds at the same time. Read more in the section Setting Up the Pedal Inputs.
Having the two controllers playing simultaneously creates some interesting harmonic possibilities:
- Separate two different sound patches by an octave or two by shifting the octave of Controller One or Two…
- Separate two different sound patches in intervals by transposing Controller One or Two up or down…
- Either of the above, but set Controller One and Two to use the SAME sound…
You can set your User Setup for Doub mode by stepping on the EDIT footswitch, and while held down, tap the “Layer” pad (E natural)
5.3.5.Melodic Chord Mode
Mel1, Mel2, Mel3
When you see any of these on the first line, you are in Melody Chord Mode. These modes tell the malletKAT what sound to play (from Controller One or Controller Two) depending on how many notes are being played simultaneously. It gives one the ability to play one sound as a melody line and another as an accompaniment sound simply by playing individual notes or chords.
There are three variations of the Melody Chord Mode. Each Mode varies slightly on where to send the notes when it sees a chord. It is always best to experiment and listen to the differences and see which Mode will work best for you.
MODE ONE: MEL1
If a chord is detected (two or more notes played together), the highest note of the chord is played on both layers
Example: You have a marimba on Controller One and a vibe sound on Controller Two. As you start to play a single line, you hear the marimba sound. When you play a C chord, (the high C is the highest note struck on the chord). The malletKAT will play the High C on both the vibes and marimba sound, and the rest of the chord is played on the marimba sound only.
MODE TWO: MEL2
If a chord is detected, all notes are played on both layers. The malletKAT temporarily jumps to DOUBLE or LAYERED MODE. As soon as a single note is played, only Controller One will play.
MODE THREE: MEL3
When a chord is detected, the highest note of the chord will be played on Controller One. All subsequent notes of the chord will play on Controller Two.
You can set your User Setup for Mel1, Mel2 or Mel3 Melody Chord Modes by stepping on the EDIT , and while held down, tap the “Hang” pad (C natural) TWO, THREE times for FOUR Times respectively.
If you let go of the footswitch and start the process again, hitting the “Hang” pad will start the Mode changes from the beginning showing you the Hang Mode, then Mel1, then Mel2 etc…
Adjusting the “Sensitivity” in Detecting Chords
The malletKAT must be able to detect the difference between two single notes meant to be played in succession, or two notes meant to be played as chord. To adjust this sensitivity to best fit your playing style, please refer to the CHORD MODE WINDOW setting in the Global Auxiliary screens.
Here is an example using Melodic Mode 2:
5.3.6.Velocity Shift Mode
When you see VelS on the screen, you are in Velocity Shift Mode. In this mode, the sound switches between CONTROLLER ONE and TWO by how hard you play.
You can set your User Setup for VELS mode by stepping on the EDIT , and while held down, tap the “Layer” pad (E natural) TWICE.
You can also set up the exact MIDI velocity point that the switch happens in the Kit Auxiliary screens.
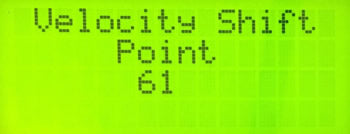
Any notes struck at or below this velocity point will use Controller 1. Any notes struck above this velocity point will use Controller 2.
For convenience, you can configure the Sustain One Footswitch to control the sustaining of both sounds at the same time. Read more in the section Setting Up the Pedal Inputs.
5.3.7.Alternate Mode
When you see Alt on the screen, you are in Alternate Mode. In this mode, every time you hit the keyboard, the sound switches between CONTROLLER ONE and CONTROLLER TWO.
You can access the ALT mode by stepping on the EDIT , and while held down, tap the “Layer” pad (E natural) THREE TIMES.
For convenience, you can configure the Sustain One Footswitch to control the sustaining of both sounds at the same time. Read more in the section Setting Up the Pedal Inputs.
5.4.Warp Mode
Warp Mode gives the malletKAT the ability to repeat any pattern in real time. The amount of repeats is controllable, along with the tempo. Besides the echo being repeated, it is also possible to change the pitch of each of the echo’s by plus or minus 12 semitones.
This means that each note struck can create a short musical sequence. To make this even more interesting, instead of just playing back the notes evenly, we have added 8 rhythmic patterns that superimpose themselves over the real notes played.
Configuring a User Kit to use Warp Mode requires a few steps. Full details are found in the section Using Warp Mode
6.Working With User Kits
You have 128 User Kits that can be configured to accomplish an endless combination of creative ways.
6.1.Setting Up The Controllers
Each of the 128 User Setups in the malletKAT is fully a customizable “KIT” used as a MIDI Controller to send data to a Sound Source or Synthesizer.
To review the “basics” of how this works, please refer to the malletKAT Essentials section.
The Most Important Thing:
Know Which Controller You Are Working On!
From the moment you press down the Edit footswitch, you will know which User Kit (User Setup) and which Controller is being edited!
You can change to the other controller by tapping the Increment/Decrement pads from the screen above.
Set up Controller One first.
Controller One is the top layer for a User Kit – it is always used.
Find and Set the Sound Patch to be Used By the Sound Source
Selecting a patch from an external synth requires three pieces of information: A Bank Change (MSB & LSB), and a Program Change Number. This includes using sounds that you want to use from the malletKAT internal sound card, if you have one. To learn more about MIDI Program Changes – particularly, where it find a synthesizers’ MSB, LSB, and Program numbers, refer to the section Understanding External Synthesizer Program Changes.
If you are NOT using sound sources that use or accept patches Program Changes (e.g. Using your malletKAT with some iOS/Android or Computer apps), then you can continue this section from Set the MIDI Channel. You can still take advantage of the powerful and creative features of the malletKAT with any MIDI program that accepts multiple MIDI channels.https://www.alternatemode.com/downloads/malletkat_ks/malletKAT_7_KS_Sound_List.pdf
The MSB/LSB/Program numbers currently being used by a User Kit appear on the bottom line of the User Kit screen. Remember – Controller 1 is the primary layer!

Set the MSB and LSB:
Press the Edit footswitch and the Kit Auxiliary pad (E natural). Scroll three times on the Forward pad (or Shortcut #03). Set the MSB and LSB numbers to the correct bank numbers.
Set the Program Change Number:
If you are in the correct MSB/LSB bank, you can quickly set the correct Program number using the Program shortcut pad (top C natural), and then use the INCREMENT/DECREMENT Pads to select the Program Number.
This Program screen also has a valuable piece of information on the third line: This is telling you where program change data is to be routed- internally or via MIDI OUT. If you are planning to send MIDI program changes to external devices, please read the section MIDI IN and MIDI Routing.
How to Disable Sending Program Changes:
You can disable the Controller from sending out initial Program Change data by setting the Program Change number to “NO” (scroll between 0 and 127). This also prevents MSB and LSB from being sent. (You may see this when first making changes to Controller Two)
Set the MIDI Channel
When this User Kit is first selected for use, this tells the sound source what MIDI channel to place your Program Change, and then routes the performance data for this Controller to this channel.
To set the MIDI Channel for this Controller, with the Edit footswitch down, tap the Channel pad (B natural middle octave).
Set the initial patch volume
When this User Kit is first selected for use, this tells the sound source where to set the initial volume for the patch. This is helpful in “blending” slight variances in volume from one patch to another, and also provides a “baseline” before using a controller pedal to change volume.
To set the initial volume for this Controller, with the Edit footswitch down, tap the Volume pad (B natural top octave)
You can also disable sending out this initial Volume change by setting the volume value to “NO” (between 0 and 127). (You may see this when first making changes to Controller Two)
Set the playing range for the patch (Octave range).
Remember that MIDI allows for a patch to extend a maximum of ten octaves! Since your malletKAT only allows you to play from two to five octaves, you will need to adjust the octave range of your instrument to where you are expecting to play pitches.
To set the octave range for this Controller, with the Edit footswitch down, tap the Octave pad (E natural top octave). Adjust up or down with the Increment/Decrement pads.
Program Changes, Channel, Volume, and Octave range are the MINIMUM that you will need when setting up your User Kit. To make additional adjustments to things like Gate Time, Transposition, Velocity settings, etc… refer to the sections Editing Functions – Pad Shortcuts and Kit Auxiliary Screens (Alphabetical)
Do you only want to use one sound patch? If so, you’re done! Otherwise…
Set up Controller Two.
You can set up Controller Two in an identical manner to Controller One. The most important things to remember are:
— If you want to use two different sound patches, then Controller One and Controller Two must use different MSB/LSB/Program numbers AND broadcast on different MIDI channels!
— If you want to use the SAME sound patch for things like using Hang Mode to extend the octave range of your malletKAT, then make sure to set Controller Two on the SAME MIDI channel, and set the Program Change and Volume values to “NO”!
Rename Your User Kit to Something “Useful”
With the Edit footswitch depressed, tap the Kit Auxiliary Pad, and then the Backward function pad once (or use Shortcut #00)

Use the Forward and Backward pads select which character location to change.
Scroll through the characters using the Increment or Decrement pads.
Hitting the number pads (black keys “1” through “0”) provide quick access to ten different characters as follows:
“1” pad: –> A
“2” pad –> M
“3” pad: — > a
“4” pad: –> m
“5” pad: –> 0 (numbers)
“6” pad: –> “ “ (space)
“7” pad: –> *
“8” pad: –> :
“9” pad: –> [
“0” pad: –> {
Quickly Test Your Controller One and Two Settings by setting the User Kit into Hang Mode. Then use the Sustain 2 foot pedal to toggle between the two controllers.
For more information on the various performance layer modes (including Hang Mode), please refer to the section User Setup Playing Modes
SHORTCUT – Checking/Setting the base Controller settings quickly…
Hold down the Edit footswitch and tap the Setup pad, and then the Forward/Backward function pads!
6.2.Setting Up the Sustain Pedal Inputs
How to Configure Both Controllers to Use One Sustain Pedal
The rear of the malletKAT has two Sustain Pedal inputs. These are used to control the sustain (like a vibraphone) for either Controller One or Controller Two.
When you start using the performance Layer Modes, it doesn’t take long to figure out that you may not have enough feet to switch between layers and independently control sustain!
To solve this, either sustain pedal in a User Kit can be configured to sustain Controller One, Controller Two, or Both.
Step on the Edit footswitch and the Kit Auxiliary pad. Tap the Forward function pad once or twice to configure the sustain footswitch inputs.

Use the Increment and Decrement pads to configure either sustain input to send a Sustain command to Controller 1, Controller 2, or the Reassignment Layer (R), or a combination of some or all of these.
Since Sustain Pedal 2 has some special functions for some layer modes, “Sustain FTSW 2” can also be configured to “No Controller”, or “none”.
For more about the Reassignment Layer, please see the section, Note Reassignments (Reassignment Layer)
6.3.Using the Foot Controller Inputs
Some functions we wish to control, like volume, vibrato, or pitch bend, require a special controller pedal that that can be adjusted in small increments.
Unlike the sustain footswitch inputs that only “see” an on/off connection, the two Foot Controller jacks can accept a either footswitch or a controller pedal. Since these two inputs are so flexible, they must be configured ahead of time to be used properly.
By default, Foot Controller One is assigned as a VOLUME controller.Using the Foot Controller Jacks requires three things
1) Train the malletKAT to Recognize Your Pedal:
Plug your pedal into the jack you wish to use.
In the Global Auxiliary area, find the starting training screen for Foot Controller One or Two (Short Cut = #8,9) and tap any pad to start training.
Follow the instructions, and release the edit footswitch.
Some pedals may operate in reverse form what is intended. In these cases, train the pedals in the opposite way.
2) Globally Define the Pedal’s “Intended Use”
Because every User Kit uses the same pedals, they must be properly defined “Globally”.
A Foot Controller pedal can be used for one of three things:
— To send a MIDI Continuous Controller Number. Control functions like Volume, Pitch Bend, Vibrato, etc… each have their own CC number. If you are plugging in a variable controller pedal, this is the setting to use. You will assign exactly WHICH CC value you want to use in each User Kit.
— To Advance or Backup through User Kits or Chains. In this case you can plug a normal footswitch into one of the Foot Controller inputs.
— To Send a MIDI Note. In this case you can also plug a normal footswitch into one of the Foot Controller inputs. The footswitches can actually send up to four MIDI notes simultaneously.
FOOT CONTROL ONE PERFORMS (Short Cut = # 19)
FOOT CONTROL TWO PERFORMS (Short Cut = # 20)
Parameters = Controller, Setup Advance, Setup Backup, One to Four MIDI Notes
If you don’t intend to use the Foot Control Inputs for Volume or other Expression Settings, you may choose to Globally reassign your Foot Control input to ADVANCE or BACKUP through your Setups.
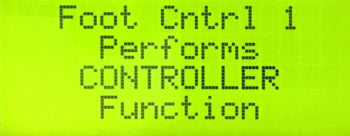
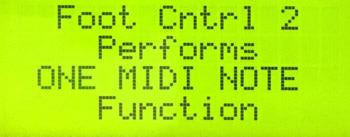
FTSW MIDI NOTES (No direct shortcut. Use Shortcut #20 and the FORWARD pad instead)
Use this screen to assign up to four MIDI note numbers to the footswitch. A velocity value and MIDI channel is also available. When the Footswitch is depressed a note on is sent. When the switch is released, a note off is sent. A value of 128 is the same as a “ALL NOTES OFF” command.
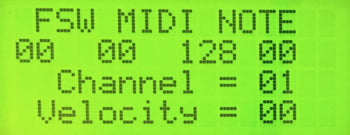
3) Configure the Pedal to a Specific Function For Each User Kit:
If you assigned the foot controller pedal as “CONTROLLER”, then you must also configure the pedal for each User Kit.
This is done on the following Kit Auxiliary screens for your User Kit:
FOOT CONTROLLER ONE ASSIGNMENT (Short Cut = # 9)
FOOT CONTROLLER TWO ASSIGNMENT (Short Cut = # 14)
Parameters = CC# 00-128 (including some individual Continuous Controller Names)
If a Foot Controllers has been designated as “Controller” – it may be assigned to any CC#.
Some commonly used functions have been named such as volume, modulation, pitch bend, chorus depth, pan, expression, etc. for convenience.
Special malletKAT Foot Controller functions are also assigned here such as Warp Volume, Blend, etc.
FOOT CONTROLLER ONE CHANNEL (Short Cut = # 13)
FOOT CONROLLER TWO CHANNEL (Short Cut = # 18)
Parameters = Same as CNTRL1, Same as CNTRL2, Both Controllers, 01-16
The MIDI channel for the effect of Foot Controller can be assigned to match the same channel as defined in either Controller. It can also be assigned to MIDI channels of Both Controllers (sends two data streams), Lastly, it can be assigned to any individual MIDI channel.
FOOT CONTROLLER ONE CURVE (Short Cut = # 12)
FOOT CONTROLLER TWO CURVE (Short Cut = # 17)
Parameters = 00-11
The response curve for Foot Controller One may be selected from any of the Curves available in the malletKAT Pro. Curve 8 was made specifically to be used as the curve for Foot Control.
FOOT CONTROLLER ONE MAXIMUM EFFECT (Short Cut = # 11)
FOOT CONTROLLER TWO MAXIMUM EFFECT (Short Cut = # 16)
Parameters = 00-127
The Maximum MIDI value that will be sent for the effect selected (CC#) for the Foot Controller. The value setting can be between 0 and 127. Adjust this so that the full depression of the Foot Controller’s pedal will be at the number set here.
FOOT CONTROLLER ONE MINIMUM EFFECT (Short Cut = # 10)
FOOT CONTROLLER TWO MINIMUM EFFECT (Short Cut = # 15)
Parameters = 00-127
The Minimum MIDI value that will be sent for the effect selected (CC#) for the Foot Controller. The value setting can be between 0 and 127. Adjust this so that the backward release of the Foot Controller’s pedal will be at the number set here.
6.4.Working With Gate Settings
Gate Time is the amount of time a note should naturally sustain before it is shut off. It represents the minimum sustain time when not deliberately extended longer with the sustain pedal or by manually holding individual notes down.
In MIDI terms, it is the amount of time between a NOTE ON command and a NOTE OFF command.
Proper control over gate times is essential in creating expressive nuances in your playing without melody notes being too short or “choppy” sounding, or too long and bleeding into each other.
Adjusting Controller One/Two Gate Time
To edit the Gate Time of a Controller, step on the edit footswitch and tap the “Gate” pad (D natural).
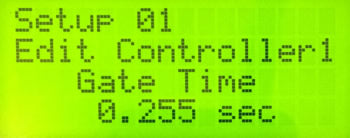
Using the INCREMENT/DECREMENT Pads, the gate time can be adjusted from 10 milliseconds to 6.1 seconds.
Special Gate Time Modes
There are also the following Gate Time modes that are available when scrolling through this edit screen to the lower (10mS) or upper (6.1S) limits:
VELOCITY Gate
You can control the Gate Time of a sound by how hard you hit the pad.
After setting the Gate Time to VELOCITY, hit the RIGHT FUNCTION PAD (Forward) Twice to get to the Minimum/Maximum Velocity Settings. The range of the Velocity Gate time is .10 to 6.100 seconds.
You can also set these Min/Max values in reverse (the harder the hit, the smaller the gate time).
FC Gate
The Gate Time of a sound can also be controlled by the position of a controller pedal.
After setting the Gate Time to GATE FC1 or GATE FC2, hit the RIGHT FUNCTION PAD (Forward) Twice to get to the Minimum/Maximum Velocity Settings. The range of the FC Gate time is .10 to 6.100 seconds.
You can also set these Min/Max values in reverse.
INFINITE Gate
This setting is specifically for Controller 2 when using HANG mode. When the gate time is set to INFINITE, the Sustain 2 pedal acts like a “Gate Toggle Switch”. When the Sustain 2 is held down, the notes from Controller 2 are played and will sustain infinitely (the original meaning of “HANG”) until the Sustain 2 pedal is held down again.
LATCH Mode
Loop Latch/ Group Performance Mode.
Latching is a Special Controller Mode that allows the malletKAT to function as a Loop Controller to use with external hardware or software programs.
When the Controller Gate Time is set to LATCH, the keys of the malletKAT do NOT play normally. The black keys turn on notes, while the white keys a half-step below turn OFF those black notes. In other words, F# plays the note with no gate time, and the F natural pad below it will turn to off.
GROUP LATCH.
When the Controller is in LATCH Mode, the high C pad also has the special function of acting as a GROUP LATCH Controller.
Hitting the high C pad will shut off ALL loops (black keys) simultaneously. Hit the Hi C again, and the loops toggle the same black keys back on.
If a sharp key is struck again, the Hi C resets and remembers only the sharp keys struck after hitting the Hi C.
Sustaining a Note by Holding/Pushing Down on a Pad
Unless you are using Dampen/DeadStroke mode, you can manually control individual sound sustain by continuing to hold down on a pad. This is similar in holding a key down on a piano.
If you are going to do this, you may need to raise the minimum velocity of the pads up because dynamics on the pads are measured in the first 2 milliseconds of your contact with the pad. On a Staccto hit, this is fine. However, if you are trying to press down on a pad in a “sustaining way”, your “push” has not amounted to much in the first 2mS.
Additional Gate Functions
Kit Auxiliary Shortcut #60
AUTO GATE MODE
This is found in the Kit Auxiliary Screens (Shortcut #60). When AUTOGATE is enabled, the gate time is affected by how fast you play by the amount programmed on this screen. The Overlap setting on the display is the amount of time the shortened note will play before being turned off, measured from when the last note was hit.
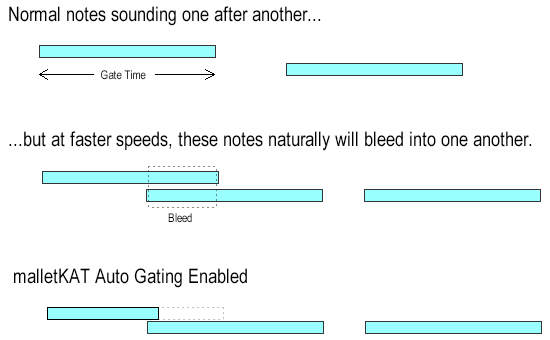
ROLL MODE
When ROLL MODE is turned on, individual notes can be polyphonic if the same note is played rapidly (thus eliminating the “machine gun effect” of certain sounds. Six Seconds after the rapid playing stops, a note off message is sent and will shut off all of the individual note “on”s. Please note that some sound sources will not “like” this function. If notes get stuck on in this mode, you must keep the Toggle set to OFF.
Press and hold the Edit footswitch and tap the GATE shortcut pad (D natural), then hit the RIGHT FUNCTION PAD Once. You can then Toggle ON/OFF the ROLL MODE Feature.
6.5.Note Reassignments (Reassignment Layer)
REASSIGNMENT MODE
Reassignment Mode in the malletKAT allows the user to redefine notes to be played on the keyboard. You can play any MIDI Note on ANY pad on the malletKAT. Each pad can have its own MIDI Channel. An entire Layout of these prearranged MIDI notes are called an Reassignment Layer.
Reassignment Layers are programmed in the Global Auxiliary area. There are a total of 14 different Reassignment Layers.
Each Reassignment Layer can set a new MIDI value (or leave a value blank [nothing happens]) for 61 chromatic notes. This corresponds to the entire range of a five octave malletKAT (see “K” numbers below).
For convenience, some of the Reassignment layers are pre-mapped – either chromatically or with all 61 notes starting with no assignment. For more on these default ranges, see the Reassignment Defaults portion of this section.
Each User Setup can have one Reassignment Layer assigned. This is done in the Kit Auxiliary area for that User Setup. In addition to assigning the Layer, you decide if you want to COMBINE this Layer with the Controller One’s MIDI output, or if you want to REPLACE the Controller One MIDI Output with this new MIDI note assignment. Each pad shares a Minimum and Maximum Velocity setting, a Velocity Curve and a Gate Time.
Global Auxiliary Reassignment Settings:
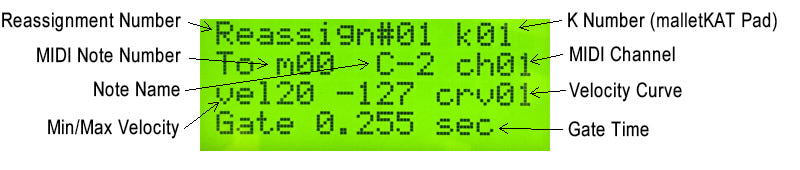
Global Auxiliary Shortcut #50-55
REASSIGNMENT NUMBER
Parameters = 01…14
On the first line of the display, select which one of the 14 Reassignments you wish to Edit.
REASSIGN K NUMBER
Parameters = 01-61
The next selection on the rst line is “k” followed by a number up to three digits. The “k” stands for which KAT pad on the malletKAT you want to reassign to a different sound. The highest note on the malletKAT is the high C, number k61. The lowest note on a 5 octave malletKAT is the low C, the number is k01.
You can use the INC/DEC pads to get to the pad number that you want to Edit OR you can quickly jump to the pad you want by stepping on the Sustain One (when the Reassign Screen is visible) then while both Footswitches are held down, hit the pad on the malletKAT that you want to edit. You will see the “k” number change as you tap on the different pads on the malletKAT.
Here are the shortcuts for editing the Reassignments
Global Edit (footswitch down)
shortcut #50 takes you to the Reassignment Screen. Keep the Edit footswitch down.
Global Edit + Sustain One Footswitch together for selecting the “k” pad on the malletKAT
Global Edit + Sustain Two Footswitch together is selecting the note assignment for that k pad.
REASSIGN M NUMBER
Parameters = C-2 – G8
On the second line of the display, you can select the MIDI NOTE that you want to assign to the pad selected on the rst line. Notice that both the MIDI NOTE NUMBER and the Actual Note/Octave name are displayed at the same time.
If you want to disable a pad entirely in a Reassignment Layer, set the note number for this pad to 128. This has a special definition of OFF. Notes that are OFF in a reassignment Layer are not passed through to Controller One – and therefore Controller One will function as it would as if there was no Reassignment Layer there at all.
You can use the INC/DEC pads to change the note that you want to reassign here or you can use the shortcut. When in this editing screen, step on the Sustain Two (the Edit Footswitch should already be depressed). While these pedals are down, when you strike a pad, it reflects the note that will sound on the “k” pad. You can change the octave in KIT AUXILIARY to get at lower or higher note numbers (e.g.: C-1, C-9, C-10).
REASSIGN CHANNEL
Parameters = 01-16
On the second line of the display, you can change the MIDI Channel for the “k” pad number that is visible. Every pad on the malletKAT can be assigned to any of the 16 MIDI channels separately.
By default, all pads of a Reassignment Layer are initially set to MIDI Channel 1. Therefore, if you are intending to COMBINE this Layer with User Setup’s Controller 1, then Controller 1 should be set to a different MIDI channel.
REASSIGN MINIMUM VELOCITY
REASSIGN MAXIMUM VELOCITY
REASSIGN GATE TIME
Each Reassignment Layer Receives one MINIMUM, one MAXIMUM and one GATE TIME setting. This setting is for the entire Reassignment Layer, not for the one MIDI note number.
Kit Auxiliary Reassignment Settings:
A Reassignment layer is assigned to a User Kit through the Kit Auxiliary screens.
Because of the flexibility that a Reassignment layer requires, there are FOUR screens used:
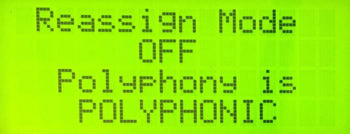
Kit Auxiliary Shortcut #29-30
REASSIGNMENT MODE
Parameters = OFF, COMBINE, REPLACE
The Reassignment Mode can be turned OFF (malletKAT plays the normal Controller One and Controller Two data). It can be set to COMBINE, which then plays the notes assigned to the Reassignment Group number along with the data from Controllers One and Two.
When the Reassignment Mode is set to REPLACE, the KIT plays the Reassignment Groups MIDI note numbers instead of Controller One and Two.
REASSIGNMENT POLYPHONY SETTING
Parameters = Monophonic, Polyphonic
This determines whether the Reassignment Group plays in Monophonic or Polyphonic mode.
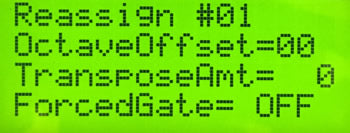
Kit Auxiliary Shortcut #31-34
REASSIGNMENT NUMBER
Parameters = 01-14
Here is where you select one of the 14 Reassignment Groups stored in the Global Settings (screen 50) to be Used in the current Kit number.
REASSIGNMENT OCTAVE OFFSET
Parameters = 00-14
You can transpose the octave of the entire Reassignment Group Number assigned to this Kit. This Octave Offset applies only to this User Kit.
REASSIGNMENT FORCED GATE
Parameters = OFF, Latch, 0.10 – 6.000 sec.
You can override the gate settings of the Reassignment Group to the Parameter Choices assigned to this User Kit.
REASSIGNMENT TRANSPOSE AMT
Parameters = -12 – +12
You can transpose the notes of the Reassignment Group up or down one octave in semitones.

Kit Auxiliary Shortcut #35-38
REASSIGNMENT EXTRA PROGRAM /VOLUME SENDS
Parameters = PC no, 00-127
Reassignment Channel 01-16 Bank MSB, LSB 00-127, 00-127 Vol no 00-127
On this screen you assign the Bank, Program Change, MIDI Channel and MIDI Volume Settings. These settings are transmitted when the User Kit is first selected to prepare the sound source/synth.
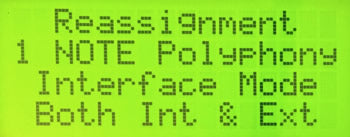
REASSIGNMENT POLYPHONY and INTERFACE
Short Cut = # 39,40
Parameters = Polyphony 1,2
Interface INTernal, EXTernal, Neither, BOTH
For more on Polyphony Modes 1 & 2, please refer to the Kit Auxiliary Screens section (POLYPHONY COUNT).
For more on interface routing, please refer to the MIDI IN and MIDI Routing section.
REASSIGNMENT LAYER DEFAULTS
For convenience in programming a Reassignment Layer, please take note of the following:
- Reassignment Layers #1-6 have pre-assigned MIDI Note values, laid out chromatically over the 61 pads making up a five octave malletKAT. Use Layers #1-#6 if you intend use the Layer to use the entire range of the malletKAT
- Reassignment Layers #7-14 have NO pre-assigned MIDI Note Values — all 61 pads are initially set to OFF. Use Layers #7-14 if you intend to use the Layer to redefine some, but not all, pads in the entire range of the malletKAT
The other Layer parameters (MIDI channel, Min/Max Velocity, Gate, and Velocity Curve) are all identical for all pads.
The following is a listing of default values of the REASIGNMENT numbers set for a Five Octave malletKAT.
Reassignment #1: C-2 to C2
Reassignment #2: C-1 to C3
Reassignment #3: C-0 to C4
Reassignment #4: C1 to C5
Reassignment #5: C2 to C6
Reassignment #6: C3 to C7
Reassignment #7-14: all keys set of OFF
REASSIGNMENT LOOP MODE
You can assign the notes in the Reassignment Layer Mode to function as a LATCH, where the first strike sends a note on, and a second strike on the same pad shuts it off. If the Reassignment is set to MONOPHONIC MODE in the Kit Auxiliary Screen, only one loop will play at a time. If the Reassignment is set to POLYPHONIC MODE in the Kit Edit Screen, it is possible to independently control multiple loops. The Hi C on the malletKAT is reserved to shut off ALL active Loops in the Reassignment.
Set the Forced GATE to LATCH in the Kit Auxiliary Reassignment screen and the notes played by the assignment layer will toggle (i.e. 1st time a pad is hit, a NOTE ON will be send and the 2nd time a pad is hit, a NOTE OFF will be sent). The reassignment layer will operate in polyphonic and monophonic modes.
Special Pad Assignment for Loop Mode: If a note number below 128 is assigned to reassignment pad #61 (hi C), striking this pad will send a NOTE OFF for all pads for which no NOTE OFF has been sent. Pad #61 will not send a NOTE ON for this pad.
If note number 128 (OFF) has been reassigned to reassignment pad #61 (hi C), to this pad will not play a reassignment note (normal) BUT will also NOT turn off notes for the other reassignment pads. This gives the user the ability to decide if one pad is capable of controlling all reassignment note offs and also allows the hi C pad to be a playable note in COMBINE mode, without turning off all active reassignment pads.
REASSIGNMENT QUICK COPY
A fast copy function has been added to the reassignment mode so that the user can copy the values of one reassignment pad to the next right adjacent pad (musically speaking, this means “going up a half-step”)
While in the Global Reassignment Edit Screen, Hold down the edit AND the Sustain ONE together:
- Tapping the FORWARD function pad will copy the existing assignment, including retaining the same MIDI Note Number
- Tapping the BACKWARD function pad will copy the existing assignment, and also increment the MIDI Note Number by 1 (up a half-step).
6.6.RTC - Real Time Controller
Real Time Controller Mode turns the malletKAT into a massive knob turning machine. Each black key on the lower two octaves of the malletKAT is assigned a channel, controller number, minimum value, maximum value, and reset value.
Once a black key is struck, the white keys act as individual values (like the position of a fader or knob on your synth). The lowest C is the minimum value, and the highest C is the maximum value. As you play on the “white key” pads of the malletKAT, the malletKAT instantly translates your last hit to the controller “knob” of your synth. The knob turning can be instantaneous, or can slide “slew” to the next value. This can create some incredible interesting effects that are not possible with real time knob tweaking. Complex rhythms can be imposed on any controller number.
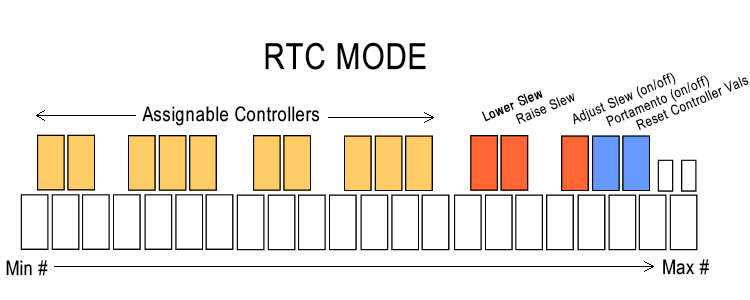
Entering and leaving a black key can also create an effect. When you leave a black key (by striking another black key), one has the option of resetting the last value and/or presetting the new value of the black key just struck.
The last (highest) octave of the malletKAT’s black keys are reserved for special functions. C# and D# are “slew” pads that automatically send continuous data in one direction. (C# slews down, and D# slews up).
To enable RTC Mode:
While the Edit Footswitch is pressed, tap the MONO shortcut pad (F natural) TWICE , tapping a third time switches to a variation mode called RTC+Velocity
Controller Two has another mode named PTW. This is activated by striking the MONO pad four times when controller 2 is displayed. See the section on Pitch Wheel for details.
With the exception of the PTW mode, both controllers can select any of these modes simultaneously, so that a KIT can use these modes in Normal, Split or Double Mode.
SPECIAL FUNCTION BLACK KEYS
The five black keys on the Master (top) octave has been reserved for special functions that effect all of the Controller Black keys. It is possible to SLEW from one value to another in RTC mode. This means that when you strike a white key, then another, you have a choice of instantly going from one value to another or allowing a “portamento” effect to take place between these values. Portamento means that the value from one white key gradually changes to the next value. The time that it takes to get from one value to another can be set using these keys.
When in RTC mode, strike the F#2 pad. The screen displays the Slew Speed in Milliseconds. This is the time it takes to get from one value to the other. This pad is a toggle. Re-strike F#2 to leave this mode.
To change the time of the slew effect, first strike F#2, then use the C#2 and D#2 pads (INC+DEC pads) to increase or decrease the values. Re-strike the F#2 pad to return to Play Mode.
When Increasing the Slew Rate, (the numbers get higher) it means that the effect is slower. The higher the value, the longer it takes to get from value to value. A value of 255 is about 1/4 of a second. By decreasing the value to 125, it means that it will get from value to value faster, twice as fast as the 255 setting.
The G#2 pad is the PORTAMENTO ON AND OFF Key. Strike this pad while in RTC mode and in PLAY mode. The screen will “burst” a message of being on or off, then resume back to PLAY mode. It is a toggle pad. Re-strike the pad to activate or deactivate this feature. Having PORTAMENTO OFF means that the values will instantaneously switch to whatever white key value is struck.
The A#2 pad is the RESET PAD. When this pad is struck in PLAY mode, it will RESET the value of the active controller to whatever value was set as the starting value for that Controller.
Assigning Controller Numbers
Controller Number assignments to the black keys in RTC Mode is a Global Assignment, meaning that there is only ONE RTC assignment in the malletKAT.
There are three screens for data entry. Global Auxiliary Screens (67,68, & 69) will all take you to the screen.
Global Auxiliary Shortcut #67
RTC KEY NUMBER
Parameters = A#-1—A#+1
This represents which black key on the malletKAT you are working on. On a three octave malletKAT, a screen display of C# represents your lowest C# on the instrument. Change the value by hitting the increment, decrement keys. Your options are C#,D#, F#, G# and A#. If a second value is present, i.e C#+1, this represents the second C# on the instrument. C#-1 is the lowest note on a four octave malletKAT, and C#-2 is the lowest note on a five octave malletKAT. Notice that the highest octave is not available. That is because the “master” octave’s black keys are reserved for special functions.
Global Auxiliary Shortcut #68
RTC CHANNEL
Parameters = 01—16
This is where you assign the channel for the “black” key.
Global Auxiliary Shortcut #69
RTC CONTROLLER#
Parameters = 00-128
This is where you assign the controller number. Choices are NO, 0-128. Number 128 is a Pitch wheel assignment. The last line on the display will show the name of the controller number assigned. For more information of MIDI Controller numbers, refer to the section MIDI Continuous Control Number (CC) Definitions
Global Auxiliary Shortcut #70-72
RTC MIN VALUE
RTC MAX VALUE
RTC RESET VALUE
The Global Edit Screens (70,71, and 72) is where you assign the MIN VALUE, MAXIMUM VALUE and RESET values.
Setting the Min and Max values gives the range of the “white key” pads on the malletKAT. Since there are 127 controller values available, and only 21 “white pads” on a three octave instrument, the malletKAT averages the total value of the assigned range over these pads. The min and max settings affect the total range of controller values that are averaged across the white pads. The RESET value is the controller value sent when the RESET PAD is struck or when Exiting and Entering a new controller pad (see below).
Notice that the top line of the display is not editable. It is for your reference to remind you of what black key you are working on.
Global Auxiliary Shortcut #73,74
RTC PREV CNTRL VALUE
RTC NEXT CNTRL VALUE
Parameters = Reset, None, Last
When you enter (strike a black key) or leave (strike another black key), the controller’s value can be reset to the value set in the RESET parameter on the previous page. This parameter can also be set to NONE, which means that the controller number will not be changed when entering or leaving a “black” key setting. It is also possible to set this parameter to LAST, meaning that the value from this black key will be remembered when you enter it again.
“Prev Ctrl Value” means the Control Number value of the last black key or the control function that you are leaving from. “Next Ctrl Value” means the Control Number value of the black key that you are going to.
Here are some examples of RTC settings and the results.
Example One:
Prev Ctrl Value: RESET Next Ctrl Value: NONE
This means that when a black key is hit, the reset value for the last controller command will be sent. If you are striking a black key for the rst time, no controller value will be sent until you hit a white key. If you have been “working” this controller, then decide to move to another black key, the original black keys controller value will be reset as you leave this controller. When you enter the new controller number, no initial value will be sent until you hit a white key.
Example Two:
Prev Ctrl Value: NONE Next Ctrl Value: RESET
This means that when a black key is hit, the reset value for this newly selected controller command will be sent. When you rst enter this controller number by striking a black key, the RESET value is sent out. When you leave this controller number by hitting another black key, the original black keys value is NOT RESET, but if you strike another black key, the new controllers value will automatically send out the RESET value.
Example Three:
Prev Ctrl Value: NONE Next Ctrl Value: LAST
This means that when a black key is hit, the value that is sent is the value that was sent the last time a value was sent for this black key. If the last value was due to a reset operation, the reset value is not sent. Only the last value sent as a result of striking a white key. This means that the malletKAT remembers what was the last value this particular black key sent out, and returns to this value when this black key is struck again.
RTC+ VELOCITY MODE
This is a special mode that allows for two controller numbers to be manipulated simultaneously. RTC is a horizontal control, meaning that values of a controller are affected by using the white keys, left to right.
Adding VELOCITY to this mode means that your dynamics, or vertical approach changes values to a controller. Playing soft or loud is interpreted as small or large controller values.
This mode is analogous to turning TWO knobs of a synth module at the same time. By thinking left to right and soft to loud at the same time, incredible effects can happen in real time, with just two sticks in your hands.
In order to properly activate this mode, the basic controller settings must first be set in the Global Auxiliary Screens. Global Screen numbers 75 and 76.
Global Auxiliary Shortcut #75
RTC CONTROLLER #
Parameters = 00-127
Global Screen #75 is where you set the MIDI Channel and Controller Number that will be affected by the velocity or the playing dynamic.
Global Auxiliary Shortcut #76
RTC RESET VALUE
Parameters = 00-127
Use Global Screen #76 to set the reset value. There are not min/max settings for this mode because the extremes are determined by the min/max velocity settings.
SPECIAL RTC PARAMETER
SLEW DATA STRIP RATE
When using the RTC Mode, there is lots of control data being sent to the sound module. In the User Setup Kit Auxiliary (Screen #43), a screen has been provided that strips or thins out some of the data. Raising the value (between 1 and 127) decreases the amount of data being sent.
6.7.Pitch Wheel
PITCH WHEEL MODE. This turns Controller Two into a massive pitch wheel. Unlike the RTC, the value of the white key returns to zero when the note is released. This simulates using a pitch wheel on a synthesizer. This mode is intended to be used in conjunction with Controller One, the actual sound, while Controller Two imposes the pitch wheel effect on Controller One.
You can access PTW by stepping on the EDIT Footswitch. While held down, tap the Mono shortcut pad (F natural) FOUR times.
You can get back to the other Modes on F natural by releasing the Edit, and then starting the process again.
The Master Octave “black keys” are reserved for Special Functions:
C#3 decrement key
D#3 increment key
F#3 (slew speed)
G#3 (Portamento mode)
A#3 (reset)
When the F#3 (slew speed) pad is struck (with Sustain 2 pedal down), the slew value is displayed, and remains there until the F#3 pad is struck again. This acts like a toggle. The idea here is that after you strike the F#3 pad, you will then use the C#3 and D#3 pads to program your slew rate. Once you have finished, hit the F#3 pad again to begin playing.
The “white keys” are each assigned a Pitch Wheel controller value from 0- 127 in the following manner.
C0 = 0 (min. controller value)
F1 = 64 (neutral controller value)
G1 = 64 (neutral controller value)
C3 = 127 (max controller value)
Keys positioned between those described above are assigned intermediate values.
If Portamento mode is OFF, striking a key will immediately send the controller value assigned to that key. The neutral Pitch Wheel value is sent when both the pad and the Sustain 2 pedal are released.
If Portamento mode is ON, striking or holding a key will slew up or down to the value assigned to that key for as long as the key is pressed OR until the Gate Time Value has expired. If the key pressure is released or when the gate time ends, the controller values will slew back to the neutral value.
When a white key is struck with the mallet, the malletKAT holds that pad down as determined by the GATE TIME. After the gate time has expired, the slew returns back to “0” at the determined slew rate when the Sustain 2 pedal is released. If the Sustain 2 pedal is still pressed when the max/min value is reached, the return slew sequence will not occur until it is released. Whenever the Sustain 2 pedal is released, the slew sequence returns to the neutral value (determined by gate time)
PTW TIPS
In order to hear the sustain sound, you must have sustain one pedal down. When you release the Hang pedal, the slew sequence returns to the neutral value at a duration of the programmed gate time of Controller 2. Make the gate time settings small so that when you release the Hang Pedal, you will have normal pitches being played on Controller one.
If you continue to press on a white key after releasing the Sustain 2 pedal, the pitch bend continues until that key is released. Holding the pad down has the same effect as holding the Sustain 2 pedal down.
6.8.Virtual Control Wheel
VIRTUAL CONTROL WHEEL A,B,C CONTROLLER NUMBER
Parameters = CC#00-127
The Virtual Control Wheel Function on the malletKAT turns a User Kit’s Controller Two into a Programmable Control Wheel. Unlike RTC, the value of the white keys return to zero when the note is released. This simulates using a Pitch Wheel on a Synthesizer. This Mode is intended to be used in conjuction with Controller One, the actual sound, while Controller Two imposes the control wheel effect on Controller One.
There are three Virtual Control Wheels (besides the Pitch Bend) that can be assigned GLOBALLY. These are Control Wheels A,B and C. In the Global Auxiliary Screens, you assign what controller number (1-127) you want to assign onto the VIRTUAL WHEEL.
Every User Kit in the malletKAT can use ONE of these three assigned Wheels to Controller Two.
The Master Octave is reserved for Special Functions.
C#3 (Decrement Key)
D#3 (Increment Key)
F#3 (Slew Speed)
G#3 (Portamento Mode)
A#3 (Reset)
When the F#3 (Slew Speed) pad is struck (with Hang Pedal Down), the Slew value is displayed, and remains there until the F#3 pad is struck again. This acts like a toggle. The idea here is that after you strike the F#3 pad, you will then use the C#3 and D#3 pads to program your Slew Rate. Once you have finished, hit the F#3 pad again to begin playing.
C0 = 0 (Minimum Controller Value)
F1/G1 = 64 (Neutral Controller Value)
C3 = 127 (Maximum Controller Value)
Keys positioned between those described above are assigned intermediate values.
If Portamento Mode is OFF, striking a key will immediately send the controller value assigned to that key. The neutral Pitch Wheel is sent when both the pad and the Hang pedal are released.
If Portamento Mode is ON, striking or holding a key will slew up or down to the value assigned to that key for as long as the key is pressed OR until the Gate Time Value has expired. If the key pressure is released or when the gate time ends, the controller values will slew back to the neutral value. When a white key is struck with the mallet, the malletKAT holds that pad down as determined by the GATE Time. After the GATE Time has expired, the Slew returns back to Zero at the determined Slew Rate when the Hang pedal is released. If the Sustain 2 pedal is still pressed when the Min/Max value is reached, the return Slew Sequence will not occur until it is released. Whenever the Sustain 2 pedal is released, the Slew sequence returns to the neutral value (determined by Gate Time).
ASSIGNING THE VIRTUAL CONTROL WHEEL to a User Kit
Controller Two can be set to CTLA, CTLB, or CTLC mode by hitting the Mono Edit Shortcut key Five times with the EDIT Footswitch depressed. The functionality is accessed by pressing Sustain 2 pedal and striking or pressing the “white keys”.
7.Full malletKAT Programming Guide
7.1.Editing Functions - Pad Shortcuts
malletKAT Express
When pressing and holding the Edit Footswitch down, the pads of the top three octaves of the malletKAT become FUNCTION pads.
When you step on the Edit and hit one of these pads, the name of that FUNCTION appears. When it does, you simply use the INC/DEC pads to change the values.
On some “white” keys, repeated hits call up different functions. On a three octave (or greater) instrument, you can also use the “black keys” as a numeric input instead of the INC/DEC pads.
FUNCTION LISTINGS
HIGHEST OCTAVE
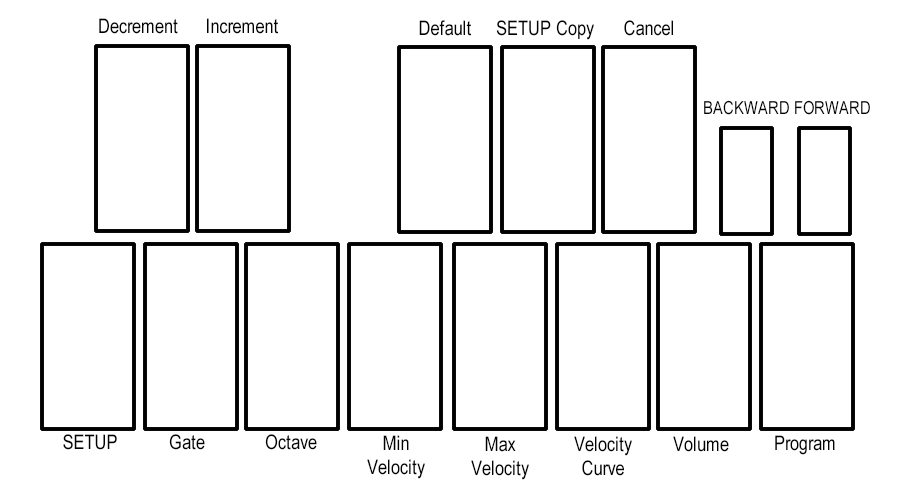
C = Setup Number
D = Gate Time Settings forward = (Roll Mode, Velocity Gate)
E = Octaves
F = Minimum Velocity Setting
G = Maximum Velocity Setting
A= Velocity Curve
B = Volume Setting
C (highest) = Program Change
C# = Decrement
D# = Increment
F# = Default
G# = S.Copy
A# = Cancel
Function Pad 1 = Backwards
Function Pad 2 = Forwards
INCREMENT and DECREMENT PADS
Use the C# pad (highest octave) for Decrement (lowering the value) Use the D# pad (highest octave) for Increment (raising the value)
Use these two pads for changing the value of the function that is called up in Editing. Each strike of the pad increases or decreases the value of “blinking” value by one.
These pads also toggle between Controller One and Controller Two when you first enter EDIT Mode by stepping on the Edit footswitch .
You can also change the value of a function by using the numeric pads (black keys of middle and lower octaves). Just use these pads to enter the number. It automatically loads in.
DEFAULT = F# pad (highest octave)
The malletKAT can automatically place in a default value for every function when you are editing. This means that when you call up a function, rather than having to guess what number to input, striking the F# pad while the function value is blinking will load in a basic “default” or normal value.
Using the Defaults will make using the malletKAT even easier for you. Whenever you want to make a new Setup, you can dump in the Defaults so that you can start out with the Setup already close to your liking. This is especially true since you can even change the Defaults to whatever your preferences are.
The Default values (for Setup settings) themselves may be changed at any time. To do this, the “Default” pad must be the rst pad hit after the Edit is depressed. From this point on, as long as the Edit is held down, the values that are being edited are the Default values instead of the Function settings themselves.
For Example: Let’s change the Default value for Channel to 4.
- Depress the Edit footswitch and keep it depressed during the following.
- Hit the “Default” Pad, (F# on the highest octave).
- Hit the “Channel” Pad, (D on the highest Octave).
- Hit the “4” Pad, (G# on the lowest octave of the malletKAT).
- Release the Edit footswitch.
Note, you have not changed the value of Channel in any of your Setups. You have only changed the Default for Channel. From now on, when you hit Default while looking at a Channel setting, the value “4” will be put in for the Channel in that Setup. Let’s continue the example by showing that:
- Depress the Edit footswitch and keep it depressed during the following.
- Tap the “Channel” Pad
- Tap the “Default” Pad. Note that the Channel has been changed to “4”.
- Release the Edit footswitch.
Now you have changed the current Setup Channel setting (for one of your Controllers).
To put your Channel back to the Channel you want (and put Default setting to the Channel you want) do steps 1 to 9 above again, except at step 4 put in the Channel number you want to use. Now you should put in the Defaults for all the values you use. This will make all of your future Setup editing easier because you can set up most the of values quickly by using the Defaults.
If you put in a Default Setup when you start editing a Setup, all of your Personal Defaults will be inserted for you. To load in a Default Setup, simply:
- Depress the Edit footswitch and keep it depressed.
- Hit the “Setup” Pad
- Hit the “Default” Pad
- Release the Edit footswitch. Now this Setup has all of your defaults loaded into it.
- The Default for Program Change is always the n of the Setup you are in. Therefore, you are unable to change the Default for Program Change.
The Default for Gate Time for Controller 2 in Hang Mode is always “Infinite.” The Default Gate Time for Controller 1 and for Controller 2 in Split and Double (Layer) is user definable.
If you change one of your Defaults for a particular setting and want to get it back to the original Factory setting, the method is as follows:
<Edit foot down> <Default> <setting> <Default> <Edit foot up>
For example, if you want to return the Default for Minimum Velocity to the original Factory setting:
1) Depress the Edit and keep it depressed during the following.
2) Hit the “Default” Pad, (F# on the highest octave).
3) Hit the “Minimum Velocity” Pad (F on the highest octave).
4) Hit the “Default” Pad again, (F# on the highest octave)
5) Release the Edit .
Now the Default for Minimum Velocity has been returned to the original Factory setting.
SETUP COPY = G# (highest octave)
This function allows you to copy the current FACTORY or USER Setup to any other USER SETUP number.
To do this, perform the following steps:
1. Hit the SETUP COPY pad (G# on the highest octave) while the Edit is pressed.
2. Enter the digits of the Setup Number to which you would like to copy the current setup by using the INC/DEC Keys.
3. Hit the SETUPCOPY pad again to see the con rmation screen.
4. Hit the SETUP COPY pad a third time to perform the copy. After the copy is performed,
the SETUP that you copied to is the CURRENT Setup
CANCEL = A# (highest octave)
To recover from unwanted changes, simply hit the CANCEL pad (A# on the Highest Octave). Changes that you have made to a Setup may be undone as long as you have not gone away from this Setup to another one.
Function Pad 1 = Backwards
Function Pad 2 = Forwards
These are the little pads on the far right of the malletKAT. In PLAY MODE, hitting the pads allow you to ADVANCE or go BACKWARDS to the next Setup. You need to hit them twice to start the Setup changing, but once you do, one hit moves the Setup one kit back or forwards.
When the TAP TEMPO / GROOVE is ENABLED, hitting the BACWARDS pad twice with the EDIT Footswitch down will determine the new Tempo. The screen will display the new tempo after the pad is struck twice.
When the TAP TEMPO/ GROOVE is Enabled, hitting the FORWARD pad toggles the GROOVE ON or OFF.
For more on using GROOVE MODE, please see the section Using the Metronome in “Groove Mode”
In EDIT MODE these pads allow you to advance backwards or forwards to the next cursor position on the screen and also to advance backwards or forwards to the next screen (examples; Global Aux Screens, Kit Aux Screens, Gate Time Screens, etc)
SETUP NUMBER = C (second highest C)
The Setup Number here refers to the User Setup (or Factory Kit) you wish to use.
GATE TIME CONTROL = D (highest octave)
ROLL MODE = D(twice)
Gate Time is the amount of time a note should naturally sustain before it is shut off. It represents the minimum sustain time when not deliberately extended longer with the sustain pedal or by manually holding individual notes down.
In MIDI terms, it is the amount of time between a NOTE ON command and a NOTE OFF command.
Proper control over gate times is essential in creating expressive nuances in your playing without melody notes being too short or “choppy” sounding, or too long and bleeding into each other.
To learn more about how the malletKAT uses Gate Times, please refer to the section Working With Gate Settings
OCTAVE = E (highest octave)
Range 00-14 This function sets the pitch range of the Controller. Each time you raise or lower the number, the entire note range of the sound goes up or down one octave.
MINIMUM VELOCITY SETTING = F (highest octave)
MAXIMUM VELOCITY SETTING = G (highest octave)
VELOCITY CURVE = A (highest octave) Range 01-11
Standard MIDI allows for up to 128 different velocity values to apply to a MIDI note. The malletKAT can detect up to 256 different pressure values resulting from your mallets striking the pad sensor. Upon detecting a pad strike, the malletKAT will translate this strike to an outbound MIDI value.
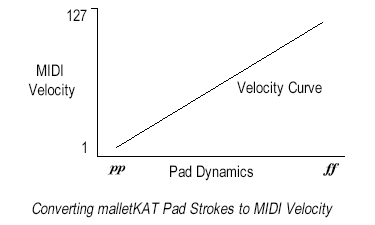
Minimum and Maximum Velocity settings will create upper and lower limits on the velocity values sent to the sound source. These can be helpful adjustments to create a “virtual compressor” on sound patches that may need to be limited to prevent dropouts or clipping.
Your softest hits on this Controller will send the Minimum Velocity setting. Your hardest hits on this Controller will send the Maximum Velocity setting.
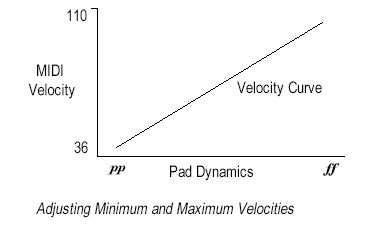
These settings are used in coordination with the Controller’s Velocity Curve to determine how quickly your softest pad hits will shift velocity values to your hardest hits.
The default Velocity Curve (Curve #1) is completely linear, as shown above. Velocity Curve #2 keeps MIDI velocity lower for longer before jumping to the top.
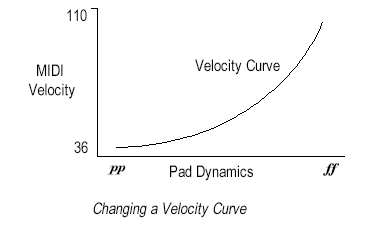
Available Curves:
- Linear Curve – natural playing curve
- Accent Curve – stays low longer, then jumps to higher velocities
- Cross-Fade Reverse Curve – starts loud and “fades out” at mid range. Use with User Kit “Double Mode” on Controller 1 to crossfade to Controller 2.
- Cross Fade Forward Curve – starts soft and “fades in” at mid range. Use with User Kit “Double Mode” on Controller 1 to crossfade to Controller 2.
- Cross-Switch Reverse Curve. Loud on soft hits, silent on hard hits. Use with User Kit “Double Mode” on Controller 1 to quickly shift to Controller 2.
- Cross-Switch Reverse Curve. Silent on soft hits, Loud on hard hits. Use with User Kit “Double Mode” on Controller 2 to quickly shift to Controller 1.
- Quasi-Linear Curve. Reverse of Curve 2
- Effective curve for Foot Controller Pedals.
VOLUME SETTING =B (highest octave) Range 00-127 This setting determines the overall volume of a patch on your sound source. When you enter a KIT SETUP, the volume command is sent to your synth. This acts like a MIDI Mixer, so you can control the volume of sound from patch to patch.
The volume will be overridden by the Foot Controllers if you are using them to control volume.
PROGRAM CHANGE SETTING =C (highest octave) Range 00-127 This setting selects a sound or set of sounds on your sound source in conjunction with the BANK SELECT # command found in the KIT AUX SCREENS #3 and 4. There are usually 128 sounds in a BANK. This screen sends a program change within the Bank selected. See the section Understanding External Synthesizer Program Changes for more information.
MIDDLE OCTAVE

C = Hang Mode, Melody Chord 1, Melody Chord 2, Melody Chord 3 Modes
D = Split Mode
E = Double, VEL Shift, ALT Mode
F = Monophonic Mode , RTC, RTC+Velocity (Layer two PTW, CTLA,CTLB, CTLC)
G = Polyphonic Mode
A = Transpose Mode
B = MIDI Channel
C# = 6 number
D# = 7 number
F# = 8 number
G# = 9 number
A# = 0 number
The following functions are all User Setup Layer Modes and are fully described in that section:
HANG MODE =C
MELODY CHORD MODE =C (2 -4 times)
SPLIT MODE =D
DOUBLE MODE =E
VELOCITY SHIFT MODE=E (twice)
ALTERNATE MODE =E (three times)
MONOPHONIC MODE = F
POLYPHONIC MODE = G
The following functions require additional settings, and are described in detail in the Programming Guide section:
RTC REAL TIME CONTROL MODE =F (twice)
RTC + VELOCITY =F (three times)
PITCH WHEEL MODE = F (four times)
VIRTUAL CONTROL WHEEL = F (5 to 7 times)
TRANSPOSE MODE = A
You can change the pitch range of either controller -12 to +12 semitones. This changes the pitch in half steps.
CHANNEL = B
This sets the MIDI Channel that the Controller will broadcast to the external Sound Source
LOWER OCTAVE
malletKAT Express
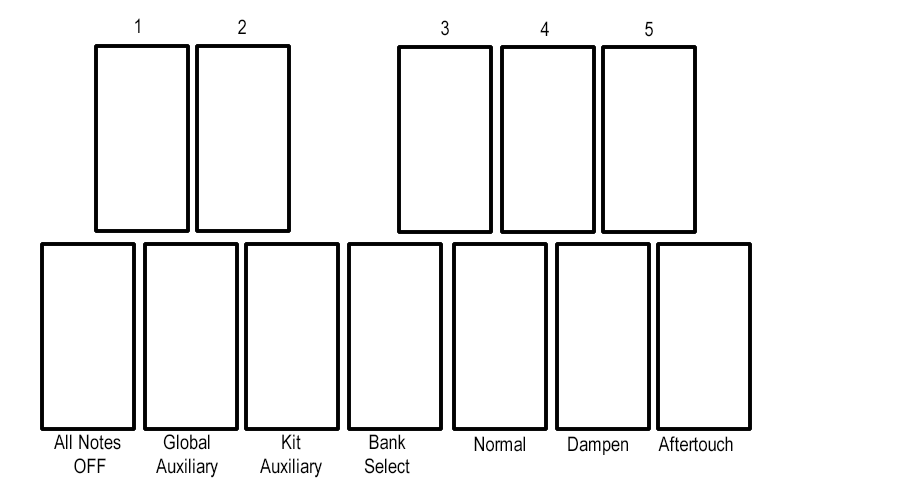
C = All Notes Off, Individual All Notes Off
D = Global Auxiliary Functions
E = Kit Auxiliary Functions
F = Bank Select (Factory, User, Chain)
G = Normal Pressure Mode
A= Dampen Stroke, Dead Stroke
B = Aftertouch Mode
C# = 1 number
D# = 2 number
F# = 3 number
G# = 4 number
A# = 5 number
ALL NOTES OFF, INDIVIDUAL ALL NOTES OFF = C
There are two kinds of ALL NOTES OFF in the malletKAT. The rst is an abbreviated version of all notes off. Press the Edit Footswitch and the Low C ONCE, to initiate the all NOTES off.
If any notes are still stuck on, hit the Low C TWICE. This will send an individual ALL NOTES OFF to every note on every channel. This will take several seconds to complete.
GLOBAL AUXILIARY FUNCTIONS = D
There are many Global Function Parameters that are in the malletKAT. There is an entire chapter “GLOBAL AUXILLARY SCREENS” that will describe each of these functions. These functions effect the entire instrument, regardless of what SETUP you are using.
There are three ways to get into the “tunnel” of screens
1. Press the Edit Footswitch , press the D natural pad, then use the Backwards, Forwards pad to navigate to the function that you are looking for.
2. Press the Edit Footswitch , press the D natural pad, then enter the screen page number using the number pads (black keys). There is a SCREEN SHORTCUT chapter that lists all of the shortcut numbers.
3. Press the Edit Footswitch , press the D natural pad TWICE. In most cases it will automatically go to the last Global Screen that you were editing.
KIT AUXILIARY FUNCTIONS = E
There are many KIT Function Parameters that are in the malletKAT. There is an entire chapter “KIT AUXILLARY SCREENS” that will describe each of these functions. These functions affect only the SETUP that you are editing. Every SETUP has its own values for each KIT AUXILLIARY Function.
There are three ways to get into the “tunnel” of screens
1. Press the Edit Footswitch, press the E natural pad, then use the Backwards, Forwards pad to navigate to the function that you are looking for.
2. Press the Edit Footswitch, press the E natural pad, then enter the screen page number using the number pads (black keys). There is a SCREEN SHORTCUT chapter that lists all of the shortcut numbers.
3. Press the Edit Footswitch , press the E natural pad TWICE. In most cases it will automatically go to the last Global Screen that you were editing.
BANK SELECT = F
The Bank Select Function allows you to alternate between the FACTORY KITS, the USER KITS and the CHAIN FUNCTION. When you rst press on the F pad with the Edit Footswitch held down, you will see the current KIT or Chain selection. To change to KIT types or to go to CHAIN, use the INC/DEC keys. When you see the KIT type that you want, release the footswitch.
On the Screen in Play Mode, you will see on the first line on the far left an ‘F’ followed by a number. i.e. F01, a ‘U’ followed by a number. i.e. U21 or a ‘C’ followed by a number. These letters represent that you are in F for Factory Kits, U for User Kits and C for Chains.
The following functions are all User Setup Layer Modes and are fully described in that section:
NORMAL PRESSURE MODE = G
DAMPEN STROKE = A
DEAD STROKE = A (twice)
AFTERTOUCH MODE = B
SPECIAL External Sequencer Controls
FOURTH OCTAVE (not available on malletKAT EXPRESS)
Three pads on the fourth octave have been set up to control an external sequencer. Step on the Edit Footswitch and press:
G = Sequence Start; A= Sequence Continue; B= Sequence Stop
7.2.Global Auxiliary Screens (Alphabetical)
To access Global Settings on your malletKAT:
Put the malletKAT into “Edit Mode” by stepping on and holding down the Edit footswitch.
Tap the Global Auxilliary pad (D natural).
You can scroll through the various customizable settings for your malletKAT using the small FORWARD/BACKWARD pads.
Changing Parameters:
Any editable parameters on the screen will be blinking. Change these parameters using the INCREMENT/DECREMENT “black note” pads.
If there is more than one editable parameter on the screen, use the FORWARD/BACKWARD pads to reach them.
Global Auxiliary Screen Shortcuts:
Because there are so many Global Settings, they can be accessed by using numeric shortcuts that will skip directly to that screen. Throughout this manual, more commonly accessed Global Auxiliary settings will be indicated like this:
Global Auxiliary Shortcut #23
To use the shortcut, after hitting the Global Auxilliary pad, type in the shortcut number using the numeric “black keys”.
All Global Auxiliary Screens are listed in this section in alphabetical order for your convenience.
Global Auxiliary Shortcut #83,84
ADJUST THRESHOLD BACKWARDS / FORWARDS
Parameters = 01-48
The pads on the malletKAT have programmable sensitivity settings. The BACKWARD and FORWARD pads have their own sensitivity setting usually set higher because these are function keys not note keys. These screens allow one to manually change the sensitivity setting. The default is set at 45. For more information, refer to the section Adjusting Pad Thresholds
Global Auxiliary Shortcut #22
AFTERTOUCH DEPTH
Parameters = 00-64
Aftertouch is a MIDI controller effect created when pressure is applied to the pad. Since different mallets have various degrees of stiffness, you need to be able to adjust how much pressure is needed to produce the Aftertouch effect you want. The larger the Aftertouch Depth setting is, the easier it is to get a large Aftertouch effect. Experimentation might be needed for nding the proper setting that is most natural to you.
Global Auxiliary Shortcut #21
AFTERTOUCH MASH COUNT
Parameters = 00-64
Performing Aftertouch with mallets can be a bit tricky because of the exibility of the mallet shafts causing double triggers and somewhat “bouncy” readings.
To give you the ability to tweak this, the Aftertouch Mask Count allows you to specify a time window within which the malletKAT Pro will look for an Aftertouch gesture. This count time is the time within which the malletKAT will regard a re-strike or pressure on a previously hit pad as Aftertouch instead of seeing it as a soft hit.
Basically, the bigger this count is, the easier it is to get Aftertouch to be recognized. The trade off is that the larger the Aftertouch Mask Count, the less you can trill on a pad in Aftertouch mode. The smaller the Aftertouch Mask Count, the “cleaner” you must be in your Aftertouch gestures, but you will also be able to more easily roll on a single note.
Global Auxiliary Shortcut #23
BANK SELECT
Parameters = Enable, Disable
You can choose to disable BANK Change Commands in your malletKAT Pro. This will prevent any Bank Messages from being sent to your sound source.
Global Auxiliary Shortcut #11
BEEPER
Parameters = On/Off
You can turn on or off the internal beeper that is heard whenever you are editing or changing Kits. Use the INCrement or DECrement pads to change this setting.
Global Auxiliary Shortcut #10
BREATH CONTROLLER TRAINING
The response of the breath controller may be set at this screen by “training” the breath controller. Your first step is to adjust the trim pots on the BC2 itself. To Train the breath controller, strike any pad one more time and release the Edit . The malletKAT Pro will sound a continuous beep. You should respond by blowing through the breath controller and then hitting a pad (while still blowing). The malletKAT PRO will again sound a continuous beep. You should now hit a pad again while blowing. The breath controller is now trained.
The Breath Controller was removed in the malletKAT 8. It is still listed here for reference to older malletKAT instruments.
Global Auxiliary Shortcut #46-49
CHAIN MODE
Chain mode is fully described in the section How To Create a Chain
Global Auxiliary Shortcut #77
CHORD MODE WINDOW
Parameters = 01-20 milliseconds
This is a Sensitivity control function when using the MELODY CHORD MODE. The parameters in this screen control how close together a pair of notes must be to be considered a chord. The lower the number, the lower the latency because the malletKAT has to wait until the programmed time has elapsed to determine if you are playing a single note or chord.
Global Auxiliary Shortcut #16
DAMPEN COUNT
Parameters = 0-255
This setting is used to adjust the time between striking a pad and when the pad may be dampened when in DAMPEN MODE. Making this setting greater makes dampening more dif cult, lowering it makes dampening easier. If the value is too low, slight bounces of your mallet on the pads may dampen notes when you don’t want them to.
Global Auxiliary Shortcut #43
DAMPEN MODE SCAN COUNT
Parameters = 0-16
This setting is the amount of time the processor takes to scan the signal to decide if the gesture on the pad is a dampen stroke. The higher the number, the more accurate the dampening stroke will be. The higher the number also adds delay. Experiment with the right setting for you.
Global Auxiliary Shortcut #45
DAMPEN RATIO
Parameters = 0-255
This screen sets a ratio between the dampen signal and the normal signal. When you apply pressure to the pad, a rise is detected in the signal. Changing this parameter helps the malletKAT to evaluate the difference between a stroke and a pressured dampen stroke.
Global Auxiliary Shortcut #15
DAMPEN THRESHOLD
Parameters = 00-255
This setting is used to adjust the dampening characteristics of the malletKAT when played in DAMPEN Mode. The Dampen Threshold is a measure of how much pressure is required to get damping to occur. Raising this value decreases the likelihood of dampening, lowering it makes dampening easier.
Global Auxiliary Shortcut #04
DATA DUMP RECEIVE
Parameters = Enabled, Disabled
You make choose to Enable or Disable the receiving of Data Dumps back into your malletKAT Pro. The default setting is Enable.
Global Auxiliary Shortcut #14
DEBOUNCE COUNT
Parameters = 01-120
Debounce time is the time immediately after a hit has been recognized, where the malletKAT PRO ignores the signal from the pad as that signal settles down. Too short of a debounce time may result in notes double triggering on one hit. Too long of a debounce time may result in fast double strokes being missed.
DEAD STROKE COUNT
Increasing the value adds a delay time before the Dead Stroke Sounds.
Global Auxiliary Shortcut #65
FINE TUNING ROUTING
Parameters = Both Int & Ext, Neither, External MIDI only, Internal Only.
This function routes a FINE TUNING command to the external sound source, or for the sound source built into the malletKAT PRO. Note that not all sound modules respond to this command. Fine Tuning of the sound source is performed on screen # 42 “Tune Instruments to 440” page.
The following Global Screens are described in the Setting Up the Sustain Pedal Inputs Section
FOOT CONTROL ONE PERFORMS
FOOT CONTROL TWO PERFORMS
FOOTSWITCH MIDI NOTES.
The following Global Screens are described in the Using the Metronome in “Groove Mode” Section
GROOVE PATTERN
GROOVE ENABLE
GROOVE ROUTING
GROOVE TEMPO
GROOVE VOLUME
Global Auxiliary Shortcut #24-39(channel 1=#24…channel 16=#39)
INCOMING CHANNEL ( 1 to 16 ) ROUTE TO
Parameters = Both Int and Ext, Neither, External MIDI only, Internal Only
When the malletKAT “sees” MIDI Channel information on the MIDI IN Port, that data can be routed to the internal sound card of the malletKAT, to the MIDI OUT Port, or can be filtered so that MIDI data from that channel is blocked.
Global Auxiliary Shortcut #06
INCOMING PROGRAM CHANGE RECEIVE
Parameters = All Channels, OFF, 1-16
The malletKAT maybe set to ignore all incoming Program Change commands, or accept Program Changes being transmitted from any MIDI channel or a specific MIDI channel.
Global Auxiliary Shortcut #40
INCOMING SYSTEM MESSAGE ROUTE TO
Parameters = Both Int and Ext, Neither, External MIDI only, Internal Only
This screen lets you select how incoming MIDI SYSTEM MESSAGES appearing at your MIDI IN are routed. The malletKAT maybe set to accept or ignore SYSTEM MESSAGES. You may set the malletKAT to route these messages to the Internal Sound Card, the External Sound Source, Both, or they can be ltered out using NEITHER. Common SYSTEM MESSAGES are MIDI Clock, Sequence Start/ Stop / Continue, Active Sensing, MIDI Time Code, Song Position Pointer/ Song Select).
Global Auxiliary Shortcut #13
UNIVERSAL ID
Parameters = Universal ID, 01-127
The “Individual Instrument ID” for the malletKAT can be assigned at this screen. This setting is used to allow external devices to selectively send data dump information to the malletKAT. This number is really useful if you have more than one malletKAT. If not, leave it set to UNIVERSAL ID. Data dump information that is meant for a malletKAT with a different ID than assigned at this screen will not be accepted by the malletKAT. (except if set at Universal ID, which accepts all).
Global Auxiliary Shortcut #41
MIDI IN PROGRAM CHANGE SOUND MAP
Parameters = SETUPS MAP, GENERAL MIDI MAP
When the malletKAT receives a Program Change Command, this data can be routed to change the Program within the Active Setup (GENERAL MIDI MAP) or it can change the SETUP ITSELF (SETUP MAP).
If you are using a malletKAT WS in a Multi Mode Configuration (more than one sound at once) or if you are using the internal sound source for another controller, using the setting GENERAL MIDI MAP sends program changes to any of the 16 MIDI channels when receiving Program Change Data from an External Source from the MIDI IN.
Global Auxiliary Shortcut #02
MIDI IN to MIDI OUT MERGE
Parameters = ON / OFF
MIDI data coming into the MIDI IN of the malletKAT may be passed through to the MIDI OUT if MIDI Merge is set to ON.
Global Auxiliary Shortcut #44
NORMAL MODE SCAN COUNT
Parameters = 3..16
This setting tells the malletKAT how long to scan or examine the pads before sending out a note. The higher the setting, the more accurate the dynamics, but the more latency it adds. The default value of 5 is the normal setting.
Global Auxiliary Shortcut #1
PERMANENT MEMORY IS
Parameters = ON/OFF
You can protect changes made to your USER KITS when you turn ON the PERMANENT MEMORY setting. If the PERMANENT MEMORY is set to OFF (the default setting) changes made to your USER Kits are automatically saved. There is no SAVE Procedure on the malletKAT.
TIPS:
The Factory KITS can not be Permanently Saved unless copied to the USER KITs. Global Settings can still be altered when MEMORY PROTECT is turned ON.
The malletKAT PRO will also accept a SYSEX Dump regardless of this setting.
Global Auxiliary Shortcut #64
PROGRAM STRING NAMES
Parameters = KIT NAMES, NONE, INSTRUMENT NAME
You can customize the way the malletKAT screen displays data. A setting of KIT NAMES, allows one to customize the names of their USER KITS. Every User Kit can have its own unique name. Once this setting is active, the malletKAT will display in PLAY mode on the third line, the KIT Name that you programmed in the KIT AUX Screens. If no name was programmed, the screen will display ****************.
A setting of INSTRUMENT NAME automatically calls up the General MIDI Instrument name nomenclature. This means that the Instrument Name is connected to the program change number, not the User Kit name. You can NOT modify these names.
The Factory Kits automatically operate in the INSTRUMENT NAME Setting. Only the USER KITS re ect this choice.
A setting of NONE eliminates all instrument names on the display. Instead, the third line shows key parameter information of Controller One, and the fourth line displays parameter information of Controller Two.
The following Global Screens are described in the Note Reassignment Section
REASSIGNMENT MODE
REASSIGNMENT NUMBER
REASSIGN K NUMBER
REASSIGN M NUMBER
REASSIGN CHANNEL
REASSIGN MINIMUM VELOCITY
REASSIGN MAXIMUM VELOCITY
The following Global Screens are described in the Real Time Controller Section
RTC KEY NUMBER
RTC CHANNEL
RTC CONTROLLER#
RTC MIN VALUE
RTC MAX VALUE
RTC RESET VALUE
RTC PREV CNTRL VALUE
RTC NEXT CNTRL VALUE
RTC CONTROLLER #
RTC RESET VALUE
SLEW DATA STRIP RATE
Global Auxiliary Shortcut #12
SCREEN ANGLE
Parameters = Straight View, Edge View
You can change the viewing angle of the screen from Straight View to Edge View.
Global Auxiliary Shortcut #03
SELECT DATA DUMP TYPE
Parameters = Global, All Memory, All Kits, Chains & Reassignments, User KITS K01-128 Use the Inc/Dec pads to decide which Type of Memory Dump you want to send. Strike the Global Pad again (D natural). The malletKAT will immediately send out the data dump. The malletKAT will automatically accept a data dump without any setup from the user as long as the Data Dump Receive Enable (screen #04) is set to Enable. This is the default setting.
THRESHOLD ADJUST
The Threshold of each individual pad may be adjusted at this screen by hitting the pad you wish to alter. When the pad has been selected, you may increase or decrease the threshold using the BACKWARD / FORWARD (F1&F2) pads. The lower the threshold, the more sensitive the pad ( & more likely to false trigger). For more information, refer to the section Adjusting Pad Thresholds
The following Global Screens are described in the Training Your malletKAT To Your Playing Style Section
TO TRAIN PADS
TO TRAIN PAD GROUPS
TO TRAIN INDIVIDUAL PAD [A…..N]
TRAINING RESULTS
Global Auxiliary Shortcut #08,09
TRAIN FOOT CONTROLLER ONE / FOOT CONTROLLER TWO
The response of FootController (1,2) may be set at this screen by training the FootController. If you would like to Train the FootController, strike any pad one more time and release the Edit Footswitch. The malletKAT will sound a continuous beep. You should respond by pressing the FootController pedal to the floor and then hit a pad. The malletKAT will again sound a continuous beep. You should now release the FootControl pedal and hit a pad again. The FootController is now trained and the malletKAT will return to PLAY Mode. Foot Controllers are fully described in the Using the Foot Controller Inputs Section
Global Auxiliary Shortcut #42,66
TUNE INSTRUMENT
Parameters = -50+50 cents, MIDI CHANNEL 1-16
If your external sound source responds to the TUNING Command or if you have an older malletKAT with sounds, you can globally detune your sound module in “cents”.
Global Auxiliary Shortcut #63, 17, & 18
VIRTUAL CONTROL WHEEL A,B,C CONTROLLER NUMBER
Parameters = CC#00-127
There are THREE Virtual Control Wheels (A,B,C) can be assigned a CC control number. Any one of these virtual wheels can be assigned to a User Kit’s Controller Two. These are further described in the section Virtual Control Wheel
Global Auxiliary Shortcut #55-58
WARP
Warp Mode gives malletKAT Controller 1 or 2 the ability to repeat any pattern in real time. The amount of repeats is controllable, along with the tempo. Besides the echo being repeated, it is also possible to change the pitch of each of the echo’s by plus or minus 12 semitones. This is further described in the section Warp Mode
7.3.Kit Auxiliary Screens (Alphabetical)
Kit Auxiliary settings affect only the User Setup that is currently selected
To access Kit Auxiliary on your malletKAT:
Put the malletKAT into “Edit Mode” by stepping on and holding down the Edit footswitch.
Tap the Kit Auxilliary pad (E natural).
You can scroll through the various customizable settings for the User Setup using the small FORWARD/BACKWARD pads.
Changing Parameters:
Any editable parameters on the screen will be blinking. Change these parameters using the INCREMENT/DECREMENT “black note” pads.
If there is more than one editable parameter on the screen, use the FORWARD/BACKWARD pads to reach them.
Kit Auxiliary Screen Shortcuts:
Because there are so many Kit Settings, they can be accessed by using numeric shortcuts that will skip directly to that screen. Throughout this manual, more commonly accessed Kit Auxiliary settings will be indicated like this:
Kit Auxiliary Shortcut #12
To use the shortcut, after hitting the Kit Auxilliary pad, type in the shortcut number using the numeric “black keys”.
All Kit Auxiliary Screens are listed in this section in alphabetical order for your convenience.
AFTERTOUCH TYPE IS
Short Cut = # 5
Parameters = Channel Pressure, Key Pressure
There are two types of Aftertouch messages that may be selected. One type is Channel Pressure and will affect notes playing on the current channel. The other type is Polyphonic Key Pressure and this affects only the note that is associated with the pad that is currently being pressed. Channel Pressure is the one most often used.
AUTOGATE Control
Short Cut = # 59
Parameters = Disabled, Enabled
When Enabled, the gate time is affected by how fast you play.
AUTOGATE CONTROL OVERLAP
Short Cut = # 60
Parameters = .010-6.200 sec
When AUTOGATE is enabled, the gate time is affected by how fast you play by the amount programmed on this screen. The Overlap setting on this screen is the amount of time the shortened note will play before being turned off, measured from when the last note was hit.
BANK MSB BANK LSB
Short Cut = # 3,4
Parameters = MSB 00-127, LSB 00-127
The MSB, LSB settings tell the sound module what BANK of sounds to call up. Refer to your sound module’s instrument listings to nd the right MSB, LSB combination for the Bank of sounds that you are looking for.
If only one bank number is present, set the MSB to 00 then set the LSB to Bank number listed. If your sound module does not respond correctly, you many need to set the MSB to 01 instead.
Please note that the MIDI Spec calls for the Bank range from 1-128. Some manufacturers prefer to use the numbers 0-127. For this reason, it might be necessary to adjust your Bank (and Program Change) settings by one number.
BREATH CONTROLLER ASSIGNMENT
Short Cut = # 19
Parameters = CC# 00-128 (including some individually named CC Functions)
This function routes the incoming Breath Control data to the speci ed Continuous Controller function.
BREATH CONTROLLER CHANNEL
Short Cut = # 23
Parameters = Same as CNTRL1, Same as CNTRL2, Both Controllers, 01-16.
Assigns the incoming Breath Control data to MIDI channels 1-16, the MIDI channel assigned to Controller 1 or 2 or Both.
BREATH CONTROLLER CURVE
Short Cut = # 22
Parameters = 00-11
This parameter controls the response of the breath controller by assigning a curved response to the incoming breath input. (linear, exponential, etc)
BREATH CONTROLLER MAXIMUM EFFECT
Short Cut = # 21
Parameters = 00-127
This parameter establishes the maximum controller effect from the incoming breath control data.
BREATH MINIMUM EFFECT
Short Cut = # 20
Parameters = 00-127
Established the minimum controller effect from the incoming breath control data.
The following editing screens are described in the section Using the Foot Controller Inputs
FOOT CONTROLLER ONE ASSIGNMENT
FOOT CONTROLLER ONE CHANNEL
FOOT CONTROLLER ONE CURVE
FOOT CONTROLLER ONE MAXIMUM EFFECT
FOOT CONTROLLER ONE MINIMUM EFFECT
FOOT CONTROLLER TWO ASSIGNMENT
FOOT CONROLLER TWO CHANNEL
FOOT CONTROLLER TWO CURVE
FOOT CONTROLLER TWO MINIMUM EFFECT
FOOT CONTROLLER TWO MAXIMUM EFFECT
INTERFACE MODE
Short Cut = # 25
Parameters = Both, Internal and External, Neither, External MIDI only, Internal MIDI Only. Controller One and Two can be configured to route their data specifically to an internal sound card, an external source, both, or neither. From firmware version 7.5B and later, this also affects which MIDI OUT port (rear or side) will have MIDI data present. Please refer to the section, MIDI IN and MIDI Routing for more information.
About KIT CONTROLLER settings:
Every User Kit on the malletKAT Pro can send a preset value on any Controller Number. This is useful when a desired effect needs to be present upon entering a kit such as a specific reverb setting or a modulation value. For more information on Controller numbers, see the section MIDI Continuous Control Number (CC) Definitions
Note: Kit Controller #1 resets the assigned discrete value to zero when exiting the kit. This means that if you have controller #1 set to Modulation, the malletKAT will automatically reset modulation to the neutral position.
All three controller numbers and values share the same MIDI channel.
KIT CONTROLLER PRESET CC#
Short Cut = # 64
Parameters = 00-127
This is where you set up the Controller number.
KIT CONTROLLER CHANNEL
Short Cut = # 65
Parameters = 01-16
This is where you set up the Controller numbers’ MIDI channel, if applicable
KIT CONTROLLER PRESET CC# VALUE
Short Cut = # 66
Parameters = 00-127
This is where you set up the exact value for the Controller number assigned.
KIT NAMES
Short Cut = # 44 or 00
Parameters = 12 characters A-Z, numbers and symbols
User Kit names can be assigned for the USER KITS (not Factory). There are a total of 12 character slots available for each kit. The KIT NAME is the same for both Controllers.
34
The characters that make up the USER KIT NAME string can be changed using the Increment or Decrement pads. The Forward and Backward pads select which character location to change. Hitting the number pads (black keys “1” through “0”) provide quick access to ten different characters as follows.
“1” pad: “A” “2” pad: “M” “3” pad: “a”
“4” pad: “m”
“5” pad: “0”
“6” pad: “ “ (space)
“7” pad: “*” “0” pad: “{“ “8” pad: “:”
“9” pad: “[“
There is a Global Setting (shortcut 64) that allows for three types of displays on the screen. Select KIT NAMES to display the names you program for each kit. Select INSTRUMENT NAMES if you want the General MIDI sound map. These are the names that are displayed on the FACTORY Kits as well.
If you don’t have sounds in the malletKAT, these names are still useful if you are using a GENERAL MIDI Sound source because the program changes adhere to the GM spec.
Select NONE for No string naming on the display. Selecting NONE allows for more KIT information to be displayed such as channel information, etc. If you are using an external sound source, and look at the sound source’s display for the instrument name, selecting NONE allows information about both controllers to be displayed.
Selecting None has no effect on Factory Kits. These non Programmable factory kits automatically display the General MIDI program names.
MONO NOTE OVERLAP
Short Cut = # 6
Parameters = Disabled, .010 – .310 second
When using a monophonic sound, sometimes the monophonic effect doesn’t sound as smooth as you like. To get more of a legato effect, this setting allows the old note to play for a short time after the new note has been struck. The old note will nally get shut off after the NOTE OVERLAP times elapses. This enhances the authenticity of playing single line instruments, such as the flute.
Some synths do not respond well to this setting. If notes get stuck on, lower the overlap time. If notes still get stuck on, you will need to disable this feature for your particular synth.
MULTIPLE HIT SMOOTHING (DAMPEN MODE)
Short Cut = # 7
Parameters = Is Not Active, Mode 1 Active, Mode 11 Active
This parameter enhances the DAMPEN features of the malletKAT. Manufacturers of Synth modules handle MIDI Note Off Commands differently. Because of this, some sound modules (such as Korg) would get “stuck notes” if two notes were played on at the same time with the sustain pedal down and the DAMPEN mode turned on.
35
The normal Dampen Mode is TYPE ONE. This will create the most natural dampening effect. This is the same type that has been implemented on all previous versions of the malletKAT.
If notes intermittently get stuck, change the Dampen Mode to TYPE TWO. This will solve the problem. Please note that the millisecond overlap screens do not have an effect on TYPE TWO. This is because TYPE TWO prevents momentary polyphony on the dampened note. This is the hidden feature in TYPE ONE that makes it sound so natural.
PITCH BEND SENSITIVITY and CHANNEL
Short Cut = # 28,41
Parameters = OFF, ON, Channel 00-16, semitones 01-12
You can set the pitch bend sensitivity (range) in semitones on every kit. Each kit is assigned an ON/OFF condition and a MIDI Channel. These settings can be assigned to the Internal Sounds (only with malletKAT WS) or to the EXTernal sound source, or Neither.
PITCH BEND ROUTING
Short Cut = # 42
Parameters = Both Internal and External, Neither, External MIDI only and Internal Only. For malletKAT’s with sounds, Pitch Bend Sensitivity can be routed to the Internal Sound Engine. If set to External, your sound module may respond to these Pitch Bend Settings. From firmware version 7.5B and later, this also affects which MIDI OUT port (rear or side) will have MIDI data present. Please refer to the section, Using an Internal Sound Card and External Devices Simultaneously for more information.
POLYPHONY COUNT
Short Cut = # 08
Parameters = 1 Note, 2 Note
The malletKAT Pro may be set to 1 note polyphony or 2 note polyphony. If one note polyphony is selected, a note currently sounding will be turned off by the malletKAT PRO before the same note is played again. If two note polyphony is selected, two notes of the same pitch will be allowed to sound at the same time before a third note of the same pitch causes one of them to be turned off by the malletKAT.
One note polyphony is different than monophonic in that only one sound of any pitch plays at one time. If notes get stuck on in two note polyphony Mode, then your sound module is not compatible with this feature. You will then need to set this parameter to one note polyphony.
The following Kit Auxiliary Screens are described in the Note Reassignment Section
REASSIGNMENT MODE
REASSIGNMENT POLYPHONY SETTING
REASSIGNMENT NUMBER
REASSIGNMENT OCTAVE OFFSET
REASSIGNMENT FORCED GATE
REASSIGNMENT TRANSPOSE AMT
REASSIGNMENT EXTRA PROGRAM /VOLUME SENDS
REASSIGNMENT POLYPHONY and INTERFACE
SLEW DATA STRIP RATE
The following Kit Auxiliary Screens are described in the Setting Up the Pedal Inputs section
SUSTAIN FTSW 1 SUSTAINS
SUSTAIN FTSW 2 SUSTAINS
WARP MODE is describe in its own section: Using Warp Mode
7.4.MIDI IN and MIDI Routing
The malletKAT has some advanced MIDI capabilities that require some additional configuration.
Consider the following real life scenarios:
1) You want to use the malletKAT with both the internal sound card and external MIDI sources – either simultaneously or independently – without MIDI “crosstalk”
2) You want an outside source like a computer/DAW, tablet, or drum pad controller to use the malletKAT internal sound card through the MIDI IN port.
3) Same as (2), but then you also want to play along with the incoming MIDI. (This is a common need when wanting to perform with accompaniment tracks with minimum equipment)
4) You want to set up your malletKAT as a part of a MIDI chain that passes through some MIDI channels, but not others.
To best explain how the malletKAT handles all of this MIDI “traffic”, we will break it up into two groups:
MIDI data generated by the malletKAT
Any MIDI data generated by a User Setup (Controller One, Controller Two, or Reassignments) must routed with one of the following:
External Only
Internal Only
Both (default setting)
Neither
This is applied to the following Kit Auxiliary settings for a User Kit:
INTERFACE MODE (Kit Shortcut #25) (Note and Channel data for Controller One or Two)
PITCH BEND ROUTING (Kit Shortcut #42)
REASSIGNMENT POLYPHONY AND INTERFACE (Kit Shortcut #30)
This is also applied to the following Global Auxiliary settings:
FINE TUNING ROUTING (Global Shortcut #65)
GROOVE ROUTING (Global Shortcut #62)
This MIDI data is routed to MIDI OUT as follows:
External (or Both) goes to the side MIDI OUT port
Internal (or Both) goes to the rear MIDI OUT port
malletKAT firmware before 7.5B routes all of this data to both ports.
MIDI data coming from the MIDI IN port
There are two settings in the Global Auxiliary area used to handle MIDI IN data. They use the same parameters (Internal Only, External Only, Both or Neither) as listed above. The default is “Both”
INCOMING CHANNEL ( 1 to 16 ) ROUTE TO (Global Shortcut #24-39) Each MIDI channel can be configured separately, and can be used to pass through, reroute, or completely block some MIDI channel data.
INCOMING SYSTEM MESSAGE ROUTE TO (Global Shortcut #40) Because there is no MIDI channel data associated with system messages, they are treated separately.
Another Global Auxiliary setting, MIDI MERGE, is only set as ON/OFF and can be used to eliminate any MIDI data coming from the MIDI IN port to be passed thru to MIDI OUT.
For obvious reasons, the word “Internal” above refers to an internal sound card.
However, be aware that this is the MIDI routing behavior regardless of the presence of an internal sound card.
Changing malletKAT User Kits through MIDI IN
The User Kits in the malletKAT can be changed via a Program Change command through the MIDI IN port. Use the Global Auxiliary setting INCOMING PROGRAM CHANGE RECEIVE (Global Shortcut #6) to set the MIDI channel that the malletKAT will “listen” to.
When a Program Change command is issued to the malletKAT, the Bank values (MSB/LSB) are ignored. Only the actual Program Change number is used to select a User Kit.
Controlling the Internal Sound Card from an External MIDI Source
If you are using an external MIDI source like a computer or tablet to trigger sounds in your internal sound card, then you likely do NOT want any external Program Change commands to spontaneously change the malletKAT User Kits.
To change how the malletKAT handles incoming Program Change Commands, use the Global Auxiliary setting MIDI IN PROGRAM CHANGE SOUND MAP to one of the following:
GENERAL MIDI MAP – this will route Program Change commands directly to the internal sound card, bypassing changing a malletKAT User Kit.
SETUPS MAP – this default setting sends Program Change commands to change the malletKAT User Kits.
Remember that each User Kit also sends Program Change commands! This can create a MIDI “loop” if program changes are being sent back and forth and cause your MIDI setup problems.
7.5.Using the Metronome in "Groove Mode"
The earlier versions of the malletKAT had a simple metronome feature that could send out a completely separate MIDI note on it’s own MIDI channel at a configurable tempo and volume. This was later merged with a Groove function, which can not only send an “even click” like a metronome, but can also be configured to use different rhythm patterns.
The Groove function is a GLOBAL function.
Global Auxiliary Shortcut #58-61
Configure the Groove
Configuring the Groove requires two editing screens. The first is found using the Global Auxiliary shortcuts 58-61.
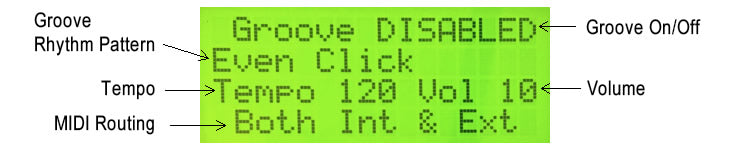
Once on this screen, use the Forward/Backward pads to select a parameter and the Increment/Decrement pads to change them.
- Set the Groove to ENABLED
- Choose a rhythm pattern. “Even Click” is a basic, even sounding metronome.
- Select a Tempo. This can be changed “on the fly” during performance with the Backward pad functioning as a tap tempo.
- Select a Volume (00 – 10).
- The Groove note MIDI can be routed separately from your user kits. For details, refer to the section MIDI IN and MIDI Routing
Tap the Forward function pad to get to the second configuration screen…
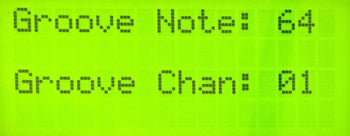
- The Groove Note number is a MIDI note number. Please refer to the section MIDI Note Numbers to assist you with choosing the correct note/pitch.
- Set the MIDI channel that Groove note will be transmitted
Using the Groove with Your User Kits
When Groove is ENABLED:
To start and stop Groove, hold down the EDIT Footswitch and hit the RIGHT Function Pad (forward pad).
To access the TAP TEMPO feature, hold down the EDIT Footswitch and hit the LEFT Function Pad (backward pad) twice at set a new tempo.
7.6.Using Warp Mode
Warp Mode gives the malletKAT the ability to repeat any pattern in real time. The amount of repeats is controllable, along with the tempo. Besides the echo being repeated, it is also possible to change the pitch of each of the echo’s by plus or minus 12 semitones. This means that each note struck can create a short musical sequence. To make this even more interesting, instead of just playing back the notes evenly, we have added 8 rhythmic patterns that superimpose themselves over the real notes played.
Warp Mode can be applied to either Controller 1 or 2 (or both) for a User Kit.
Kit Auxiliary Shortcut #55-59
To configure Warp Mode:
To configure Warp Mode, select either Controller 1 or 2 and then use the Kit Auxiliary shortcuts 55-59. Use the Forward/Backward short pads to switch between parameters, and the Increment/decrement pads to change them.
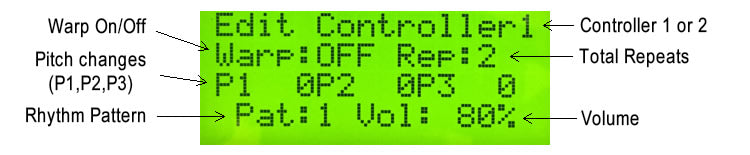
Enable the Warp Mode by turning it ON
Set the number of repeats from 1 to 3
Each of the three repeats can have their pitches transposed up or down (-12 to 12) semitones.
The fourth line is for applying a PATtern to the notes. The pattern are as follows:
1: Straight eighth notes in groupings of two
2: Quarter note followed by 2 eighth notes.
3: Two eighth notes followed by a quarter note.
4: Eighth note, quarter note, eighth note.
5: Eighth note triplets
6-8: Various other patterns.
A repeat count of 1 plays two notes. A repeat count of 2 plays 4 notes, etc.
You can change the tempo of the Echo by:
- Stepping on the Edit Footswitch , (held down)
- Tap the Backward Pad twice (for Tempo)
- The function GROOVE must be ENABLED for this to function. (refer to previous section on Groove)
Due to a lack of space on the screen, the performance mode screen (when you release the Edit footswitch) will NOT indicate that the User kit is using Warp Mode. You may want to rename your User Kits slightly to indicate those that have Warp Mode assigned to them!
Other Warp Mode Notes:
If in the User Kit is using Double Mode, only Controller One Warp will operate. Reassignments also do not respond to Warp Mode.
It is also possible to control the repeats of the echo with a Foot Controller. Assign Foot Controller 1 or Foot Controller 2 to WARP VOLUME. For more information on using foot controller pedals, refer to the section, Using the Foot Controller Inputs
8.Additional Useful Info
This section contains insightful information in providing context for working with your malletKAT
8.1.Understanding External Synthesizer Program Changes
This section is a very basic overview for understanding how synthesizers can process and output different sounds (patches) either individually or simultaneously. This is helpful information if you are using your malletKAT to access different patches on an external synthesizer module (e.g.: the GIGKAT, or Yamaha Motif XS) OR if your malletKAT contains an internal sound card.
The KS sound card inside your malletKAT is a full, professional level synthesizer!
The MIDI Standard has changed very little since it was established in 1983. Because of this, all MIDI-compliant devices – no matter their age – can still communicate with one another.
Synthesizer Sounds (Patches)
For purposes of this section, the only thing that we really need to know is that this standard only recognizes numbers from 0 – 127. This means that original synthesizers built in the 1980’s were limited to 128 sounds. To change sounds on a synth via another MIDI controlling device, the controlling device would send a PROGRAM CHANGE command to the synth, followed by a number from zero to 127.
The 128 Factory Setups in your malletKAT conform to the original General MIDI Instrument Specifications. We have kept the Factory Setups in the malletKAT in case you want to connect your malletKAT to a synth that still uses General MIDI (GM).As synthesizers and computers became more sophisticated, manufacturers wanted to include more than 128 patches in their instruments. The solution was to place multiple groups of 128 Programs into separate BANKS. The MIDI Standard was slightly modified to accept a BANK CHANGE along with a PROGRAM CHANGE. A Bank Change is actually TWO pieces of information: a Most Significant Bank (MSB) number, and a Least Significant Bank (LSB) number.
Both the MSB and LSB numbers are also limited to 0-127 – but now a synthesizer could have 127 banks of 127 sounds each by changing the LSB number! At this point, the MSB is typically used by manufacturers simply to differentiate their line of products from others. That may change more in the future.
Using a screenshot of the patch list from the KS Sound Card, we see these different MSB, LSB, and Patch Numbers are used to access a large number of patches!
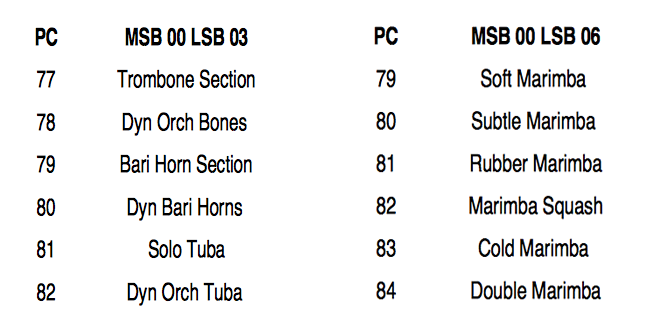
Here we see that the same Program Change numbers are used for different patches by using a different LSB number.
To call up a “Rubber Marimba” Patch, the controller must send MSB:00, LSB:06, and PC:81 to the synth.
How a Synthesizer processes multiple patches simultaneously. (Multi Polyphony)
The MIDI Standard can accommodate up to 16 separate channels of MIDI performance information simultaneously. This allows MIDI instruments to access and output up to 16 different patches simultaneously.
Because each User Setup in your malletKAT has two controllers, your malletKAT play two different sounds on two different channels!8.2.Why is There No USB Port on my malletKAT?
The answer here is twofold:
1) Even as the home computer/DAW has become more popular than ever, the standards and protocols for passing digital information (USB, Firewire, Thunderbolt, etc…) keep changing. Meanwhile, the MIDI standard used to connect digital musical instruments either directly to synthesizers has remained completely stable since we started building instruments in 1984.
2) While the internal processing speeds of DAWs (and handheld devices, for that matter) have improved dramatically, it is still a widely accepted fact that the highest sound quality and least latency from any digital music environment is achieved by using an external audio processor – all of which include MIDI ports. The audio processor can then pass MIDI along with additional data as a single communication stream using whatever communication standard your DAW requires.
All that being said, we are experts in MIDI, and prefer to let the experts in future USB/Thunderbolt standards fight their own battles.
8.3.malletKAT Velocity Curves
8.4.MIDI Note Numbers
Below is an image showing the MIDI standard “conversion” from note names to note numbers. The notes shown are those of a standard eight octave piano keyboard.
Since MIDI allows for values from 0-127, some note numbers can extend beyond this range in both directions.
8.5.MIDI Continuous Control Number (CC) Definitions
List of Standard MIDI Continuous Controllers (CC’s)
Here is a list of the standard MIDI continuous controllers. Use these controllers to manipulate your MIDI data to make the music more expressive. You use these to add expressive devices like add vibrato, add abrupt or gradual volume changes, add and control the amount of reverb, tremolo, and/or chorus, and so on. The most commonly used CC’s are in bold typeface
For most controllers marked (on/off) controllers, on=127 and off=0. For all others, the higher the value, the more intense the effect is.
Note: Not all synthesizers respond to all CC’s. There should be a list in your synth manual. It’s usually in the back and it is usually called the MIDI implementation chart. If you don’t have the manual or can’t google one, try a few to see if they work. If you find this page helpful, feel free to link to it.
The MOST COMMON CC’s used by the malletKAT are labeled for you (Volume, Sustain, Bank Select, Mod Wheel, etc…) instead of using a CC number
- 0 Bank Select (MSB)
- 1 Modulation Wheel
- 2 Breath controller
- 4 Foot Pedal (MSB)
- 5 Portamento Time (MSB)
- 6 Data Entry (MSB)
- 7 Volume (MSB)
- 8 Balance (MSB) Some synths use it
- 10 Pan position (MSB)
- 11 Expression (MSB)
- 12 Effect Control 1 (MSB)
- 13 Effect Control 2 (MSB)
- 14 Undefined
- 15 Undefined
- 16 Ribbon Controller or General Purpose Slider 1
- 17 Knob 1 or General Purpose Slider 2
- 18 General Purpose Slider 3
- 19 Knob 2 General Purpose Slider 4
- 20 Knob 3 or Undefined
- 21 Knob 4 or Undefined
- 22-31 are undefined, available for use by synths that let you assign controllers.
(e.g. sending special triggers to programs like Abelton or MainStage)
- 32 Bank Select (LSB) (see cc0)
- 33 Modulation Wheel (LSB)
- 34 Breath controller (LSB)
- 36 Foot Pedal (LSB)
- 37 Portamento Time (LSB)
- 38 Data Entry (LSB)
- 39 Volume (LSB)
- 40 Balance (LSB)
- 42 Pan position (LSB)
- 43 Expression (LSB)
- 44 Effect Control 1 (LSB) Roland Portamento on and rate
- 45 Effect Control 2 (LSB)
- 46-63 may eventually be in use as the LSB for controllers 14-31 in some devices
- 64 Hold Pedal (on/off)
- 65 Portamento (on/off)
- 66 Sustenuto Pedal (on/off)
- 67 Soft Pedal (on/off)
- 68 Legato Pedal (on/off)
- 69 Hold 2 Pedal (on/off)
- 70 Sound Variation
- 71 Resonance (aka Timbre)
- 72 Sound Release Time
- 73 Sound Attack Time
- 74 Frequency Cutoff (aka Brightness )
- 75 Sound Control 6
- 76 Sound Control 7
- 77 Sound Control 8
- 78 Sound Control 9
- 79 Sound Control 10
- 80 Decay or General Purpose Button 1 (on/off) Roland Tone level 1
- 81 Hi Pass Filter Frequency or General Purpose Button 2 (on/off) Roland Tone level 2
- 82 General Purpose Button 3 (on/off) Roland Tone level 3
- 83 General Purpose Button 4 (on/off) Roland Tone level 4
- 91 Reverb Level
- 92 Tremolo Level
- 93 Chorus Level
- 94 Celeste Level or Detune
- 95 Phaser Level
It’s probably best not to use the group below for assigning controllers.
- 96 Data Button increment
- 97 Data Button decrement
- 98 Non-registered Parameter (LSB)
- 99 Non-registered Parameter (MSB)
- 100 Registered Parameter (LSB)
- 101 Registered Parameter (MSB)
It’s very important that you do not use these no matter what unless you want to invoke these functions
- 120 All Sound Off (this is the ALL NOTES OFF keyboard shortcut)
- 121 All Controllers Off
- 122 Local Keyboard (on/off)You might actually crash your keyboard if you use this one.
- 123 All Notes Off
You typically don’t want your synths to change modes on you in the middle of making a song, so don’t use these.
- 124 Omni Mode Off
- 125 Omni Mode On
- 126 Mono Operation
- 127 Poly Operation