Visual Editor Software Manual -- ONLINE & PDF
1.malletKAT Visual Editor
Online Documentation Last Revised: Jan 31, 2019
The malletKAT Visual Editor is designed to allow you to visualize and modify the parameters of your instrument as a whole using your PC, Mac (coming 2019), or iOS tablet (coming 2019).
The Visual Editor accepts and sends MIDI SysEx files to and from your malletKAT (known as “Dumps” in the malletKAT manual). This allows you to archive and store different programming configurations for later retrieval.
The malletKAT Visual Editor is available as a free download on the Alternate Mode website:
https://www.alternatemode.com/altmode-info/kat-downloads
For information on connecting your editor to the malletKAT:
#quick-start-guide
To review the basics of how the malletKAT works:
#essential-information-to-understand-your-malletkat
1.1.Requirements
The malletKAT Visual Editor requires a current User Kit SYSex file dated 12/12/18 or later.
This SYSex file is downloadable on the Alternate Mode Website, and is compatible with hardware versions 6.x and later.
These User Kit Presets can also be permanently added with a hardware chip upgrade. A hardware chip will keep the default presets after reinitializing your instrument.
1.2.SysEx File Storage
All SysEx files used by the editor are stored in a folder named MK_Data_Dumps in the top level of your PC’s C:// drive.
 Do NOT relocate or move this folder from this location, or the editor will not be able to find them.
1.3.First Use
On your first use of the editor, the User Kits shown will be generic – named “User Kit #1”, “User Kit #2”, etc.
You will want to start using the editor by providing it with the current settings of your malletKAT. This can be done two ways:
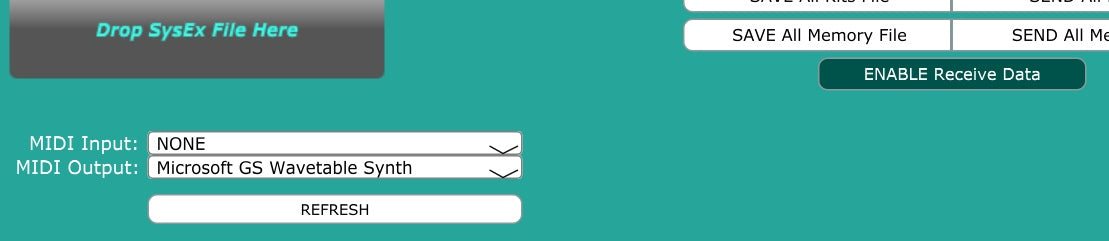
- By dragging a SysEx file from the file window onto the “Drop SysEx File Here” button on the main screen of the editor
- By sending a SysEx memory dump of your malletKAT to the editor
The editor will accept and translate the following types of memory dumps from the malletKAT:
- Global Settings
- User Kits
- Chains and Reassignments
The editor cannot translate “All Memory Dumps” at this time.
#protecting-the-malletkat-memory
Before sending a memory dump to or from the editor
- Make sure that the MIDI Input/Output Assignments on the main editor page are correct
- Make sure that the ENABLE Receive Button on the editor is active
Before sending data from the editor to the malletKAT
While using the editor, you will also want to be sure that the malletKAT is configured to allow changes – since memory can be protected (or locked) to prevent accidental changes.
2.Main Editor Screen

1. File Storage Window – If you have previously created files with the editor, they will appear here
2. File Upload Button – If you have older malletKAT dump files, you can add them to the editor by dragging them here.
3. MIDI Input/Output – These should be defined to match your connection setup to allow communication back and forth between the editor and the malletKAT
4. User Kits – A list of all currently defined User Kits. To copy or rearrange the order of User Kits, use the drop down menus appearing for each kit. To EDIT a User Kit, use the “Kit Editor” button in the lower right corner.
5. Save/Send File – Save your settings to your PC, or send them to the malletKAT
6. Enable Receive – Before sending a memory dump FROM your malletKAT to the editor, this button must be enabled.
7. Performance Mode – this convenient screen provides a “Large Print” view of the currently selected User Kit.
8. Parameter Editing Buttons – these buttons open additional screens for editing additional functions
3.User Kit Editor Screen
If you are new to the malletKAT, this screen can be a bit daunting.
For an overview of how User Kits work:
#building-custom-user-kits
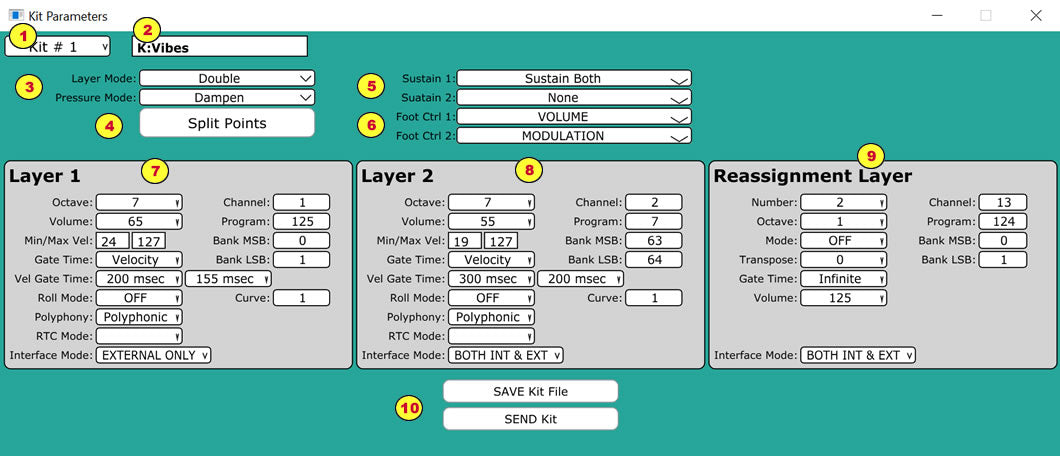
1. Kit Select
2. Kit Name – change the name of your User Kit by editing the text in this box
3. Performance Modes –
#playing-modes
4. Split Point Assignments – Use this button to assign split points for Controllers 1 and 2 if your User Kit is set for SPLIT Mode.
Split Mode – Assigning Split Points
5. Sustain Pedal Assignments –
#setting-up-the-pedal-inputs
6. Footswitch Assignments –
#using-the-foot-controller-inputs
7/8. Kit Layer 1 & 2 Assignments
9. Reassignment Layer – this is a specialized function for each User Kit, allowing any pad of the malletKAT to be reassigned any note value on any channel, independently from the other layers. See Reassignment Layer Screen
10. Save/Send File – Save your settings to your PC, or send them to the malletKAT
4.Reassignment Layer Screen
The Reassignment Layer is a specialized function for each User Kit, allowing any pad of the malletKAT to be reassigned any note value on any channel, independently from the other layers.

1. Reassignment Select – edit one of the 14 available reassignments
2. PAD Select – use the keyboard to select a malletKAT pad to view and edit it’s current reassignment
malletKAT instrument pads are arranged right to left. For example, a malletKAT Express will occupy the two furthest right octaves in this window.3. MIDI Note Number – the MIDI note number assigned to the selected pad
See MIDI Note Number reference chart –#midi-note-numbers
4. MIDI Channel – the MIDI Channel assigned to the selected pad
5. Velocities and Gate Time Settings – are applicable to the entirereassignmentlayer, not individual pads
6. RTC Settings – Real Time Controller Settings for a user kit are defined in this box.
This is a specialized function.
#rtc-real-time-controller
#pitch-wheel
#virtual-control-wheel
7. Save/Send File – Save your settings to your PC, or send them to the malletKAT
5.Chain Editing Screen
Chaining is used to organize and cycle through your User Kits in any order for convenience in performance.
#how-to-create-a-chain

1. Chain Select – edit one of the 16available chains
2. Step Assignments – Assign a user kit to each of the chain’s sixteen steps. You may also assign any step to NEXT CHAIN or LOOP.
6.Split Mode - Assigning Split Points
If the Performance Mode of a User Kit is set to SPLIT Mode, then both Controllers 1 and 2 are accessible on the malletKAT without the need of the sustain 2 pedal (LAYER mode).
The Split occurs by assigning the pads used for Controller 1 beginning from the far RIGHT of the malletKAT, and the pads used Controller 2 beginning from the far LEFT of the malletKAT.
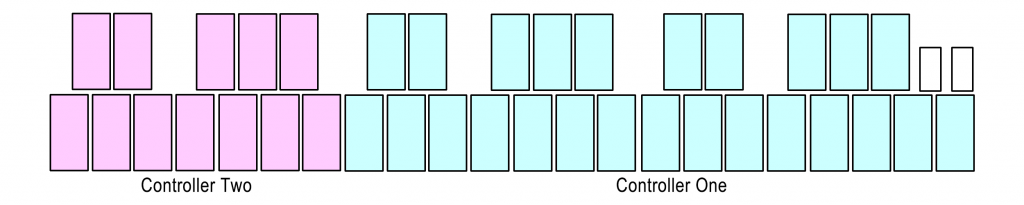
With this setup in mind, the only two parameters that need to be identified to make a split are:
- The lowest pad to be used for Controller One
- The highest pad to be used for Controller Two
These assignments can also allow for some pads to overlap (play on both controllers), or not be used at all.
For more information on Splits, please refer to the online manual.
#how-to-create-a-split
Setting Split Points with the Visual Editor:
(1) Highlight either Controller Layer, and click on the pad to make the assignment.
Alternatively, you can use the pulldowns (2) and (3) to manually adjust the pads assignments.
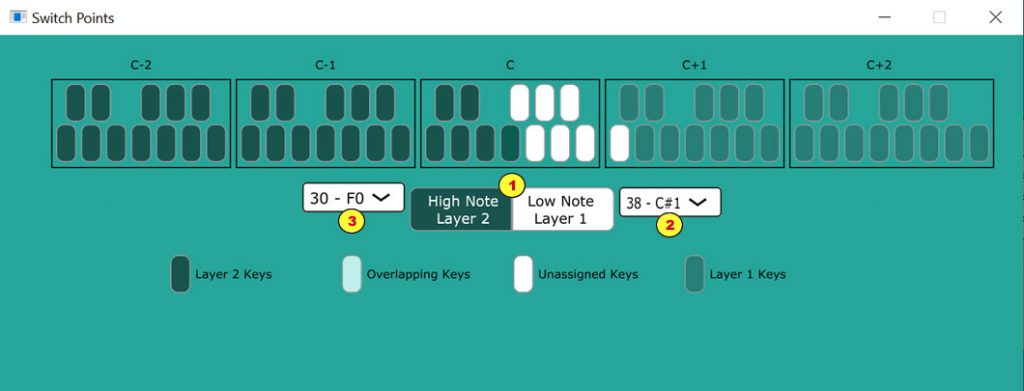
The Visual Editor Split Point Screen shows a FIVE OCTAVE INSTRUMENT – the maximum size available. If you are using a smaller size, your pad assignments are valid from the far rightmost pads.
For example:
On a three octave malletKAT Pro, the split point screen shown above shows that only the lowest six pads are assigned to Controller 2.
On a two-octave malletKAT Express, the lowest pad is unassigned, and NO PADS are assigned to Controller 2.
